October 3, 2012

Pico De Gallo with Zucchini


Well, it's time to use up the last of the summer zucchini, and I don't know about you guys but I cannot eat another bite of zucchini bread. I love the stuff, but there's only so much you can make and eat in one summer... 
Oh, who am I kidding? I can always eat another bite of zucchini bread! 
Really, I was just looking for a creative way to get my "zuke vites." That's what I call the vitamins from zucchini. This is a throwback from ten years ago when I worked at Starbucks and the button on the cash register for zucchini bread said simply, "ZUKE LOAF." So, my coworkers and I would quip, in a thick Italian accent, "You look thin! Come inta the kitchen and have some ah ya mutha's zuke loaf." It still makes me chuckle to say it. 
Anyway, try out this pico de gallo recipe. I literally never measure my ingredients when I make pico de gallo. I just start throwing stuff in and then I adjust the ingredients to taste. So, this recipe is really just a starting point. You will need to taste it a lot as you make it, and adjust as you go. If you're going to be eating it with tortilla chips (is there any other way??) then you will want to taste it with a chip as you make it. The salt from the chip is more than adequate to salt your pico, in my opinion. If you don't intend to eat it with chips, you might need a bit more salt.

8 to 12 Roma tomatoes, chopped
Half a white onion, chopped
1 medium zucchini, chopped
1 large jalapeno pepper, seeded and finely minced
2 cloves of garlic, finely minced
A generous handful of fresh cilantro leaves, finely chopped
Lime juice, to taste
Salt and pepper, to taste
  • Toss everything into a bowl and stir. Easy peasy.
  • I recommend covering with and airtight lid and allowing it to chill in the fridge for a few hours before eating. You don't have to do this, but I find that after it sits a while and the flavors mingle together, it tastes even more fantastic.
  • Enjoy!

October 2, 2012

The *NEW* Best Vegan Chocolate Chip Cookie!


Anybody remember this post from a year ago? The one where I touted a certain chocolate chip cookie as being "the best?" Yeah, well that was a good cookie - don't get me wrong - but it has now been replaced by these! This is the "Homestyle Chocolate Chip Cookies" recipe from Dreena Burton's cookbook, Vive le Vegan!(published by Arsenal Pulp Press).

If you don't already own this cookbook, you should get it, especially if you're the parent of a young child - it's chock full of kid-friendly recipes and tips. I pull this one down off the shelf at least twice a week. And I have owned this cookbook for well over a year, but I never tried the chocolate chip cookie recipe until yesterday.

I am seriously lamenting all the months I spent not knowing how fabulous these cookies are. These are easily the best vegan chocolate chip cookies I have ever eaten. I just had to share this recipe! The problem with most vegan cookie recipes is that they are too cakey, not like their omnivorous counterparts whose massive infusions of butter make them so ooey-gooey soft on the inside and crispity-crunchy on the outside. I don't know how Dreena Burton did it, but she came up with a magical combination of ingredients that makes these cookies seem like they're baked with two sticks of butter. And she keeps the refined sugar to a minimum as well. Thank you, Dreena Burton. You are my new hero!

Be sure to follow the directions exactly as they are written. If you don't, your cookies may not turn out right. I know this because my first attempt at this recipe failed miserably when I went my own way with the mixing method.

Oh, and just a warning - you might want to put a lock on your cookie jar. My four-year-old loved these cookies so much she kept traveling back and forth to our Doctor Who Tardis Cookie Jar. I know this because the jar makes a sound every time it's opened and I heard that sound a lot yesterday!

1 cup unbleached all-purpose flour (or 1 1/4 cup spelt flour)
1 teaspoon baking powder
1/2 teaspoon baking soda
1/4 cup unrefined sugar
1/4 teaspoon sea salt
1/3 cup pure maple syrup
1/4 teaspoon blackstrap molasses
1 1/2 teaspoons pure vanilla extract
1/4 cup canola oil (a little generous)
1/3 cup non-dairy chocolate chips
  • Preheat oven to 350 degrees. 
  • In a bowl, sift in the flour, baking powder, and baking soda. Add the sugar and salt, and stir until well combined. 
  • In a separate bowl, combine the maple syrup with the molasses and vanilla, then stir in the oil until well combined. 
  • Add the wet mixture to the dry, along with the chocolate chips, and stir through until just well combined (do not overmix).
  • Place large spoonfuls of the batter on a baking sheet lined with parchment paper and flatten a little.
  • Bake for 11 minutes, until just golden (if you bake for much longer, they will dry out). 
  • Let cool on the sheet for no more than 1 minute (again, to prevent drying), then transfer to a cooling rack.
Visit Dreena Burton's website, Plant Powered Kitchen!

Other cookbooks by Dreena Burton:

October 1, 2012

Kale and Bean Soup


The perfect companion to a rainy day in autumn is this wonderfully rich and hearty kale soup. It's so healthy too - it just makes you feel all warm and cozy inside while you eat it. I like to dip a vegan-buttered slice of ciabatta baguette into mine (and by "a slice," naturally, I mean half a loaf of...)
It keeps great in the fridge too, so you can eat on it for several days. The kale starts to lose its rich color after a couple of re-heatings, but it still tastes great!

1 medium white onion, chopped

1 tablespoon extra virgin olive oil
4 cloves garlic, minced
1 bunch kale, stems removed and coarsely chopped
4 cups vegetable broth
1 28-ounce can diced tomatoes, undrained
1 15-ounce can great northern beans, rinsed and drained
1 cup water
1 bay leaf
1 teaspoon paprika
Salt and pepper, to taste
Any of your favorite Italian seasonings (I used basil, parsley, oregano, marjoram, and thyme), to taste
  • In a large pot, saute onions, garlic in olive oil until tender. You can add a few splashes of water or vegetable broth as needed to prevent sticking.
  • Add the broth, kale, tomatoes, water, seasonings, and bay leaf. Bring to a boil, stirring occasionally.
  • Reduce heat, add beans, cover, and simmer, stirring occasionally, for about 45 minutes. 
  • Discard bay leaf and serve.
  • Enjoy!
Note: If you can swing it, the addition of sliced and browned Tofurky Italian Sausage throws the soup right over the top!

September 25, 2012

Oatmeal-Chocolate Chip Pancakes


These pancakes are rich, chocolatey, delicious, and jammed full of fiber. Top with a pat of vegan butter and some pure maple syrup. How can you go wrong?
 
1 1/2 cups old-fashioned rolled oats
1 1/2 cups unbleached white whole wheat flour
1/2 cup flax meal
1 tablespoon + 1 teaspoon baking powder
1 tablespoon stevia (or preferred sweetener)
1 teaspoon baking soda
1 teaspoon salt
1 teaspoon vanilla extract
3 cups soy milk
1 cup vegan semi-sweet chocolate chips
  • Mix all dry ingredients together in a large bowl. 
  • Make a well in the dry ingredients and add the vanilla and one cup of soy milk. Stir gently with a wooden spoon until just mixed. Add the remaining soy milk, one cup at a time, stirring after each addition. 
  • Fold in the chocolate chips. 
  • Drop onto a pre-heated/pre-greased griddle and cook until bubbles start to form, just one or two minutes. Watch closely! Then flip and cook on the other side for another minute or so. 
  • Enjoy!
BULGING BELLY WARNING: 
This recipe makes a lot! I use this recipe to feed a family of three, and we usually have enough leftovers for at least one of us. So, if you're only cooking for one, or don't want any leftovers, you might want to cut the recipe in half. If you don't mind leftovers, your extra pancakes will keep well in the fridge (in an airtight container, o' course) and can be quickly reheated in a warmed skillet or toaster oven.

September 22, 2012

Homemade Taco Seasoning


In my experience, the best way to save money is by doing stuff yourself instead of paying someone to do it for you. I'm sure that might have elicited a few "d'uhs" from the crowd, but I felt it was worth saying. I mean, why pay a corporation to slap a fancy label on a spray bottle of chemically-toxic window cleaner when you can squirt some vinegar on the glass and get the same result, minus the lung irritation?

So, I'm going to intermittently start posting DIY-style recipes for all kinds of great stuff, particularly stuff that leeches money out of your wallet unnecessarily. From cleaning products to spice mixes, just keep tuning in and start taking notes. I've got some great ideas to share with you!

To start with, here's an easy recipe for homemade taco seasoning. The ingredients are inexpensive and you can make up a nice big bowl of this stuff for what you might pay for just a few packets of the store-bought mess, and you won't have to worry about MSG and anti-caking agents. It's a win-win!

2 tablespoons chili powder
2 teaspoons salt
2 teaspoons black pepper
1 teaspoon paprika
1 teaspoon cumin
1/2 teaspoon garlic powder
1/2 teaspoon onion powder
1/2 teaspoon dried oregano
1/2 teaspoon crushed red pepper flakes

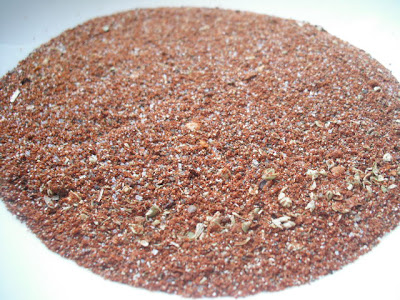
Here's what the finished product will look like.
  • I recommend sprinkling in about 3 tablespoons of seasoning per pound of veggie crumbles, and maybe drop in a teaspoon or two of water as well. 
  • Enjoy!

September 21, 2012

Quinoa with Roasted Corn and Cilantro


My husband, believe it or not, does the majority of grocery shopping for our family. My daughter goes with him and they make it a fun outing, which gives me a nice little break every week. But it also means that I sometimes wind up with weird stuff, and missing some key items too. No offense to my shoppers, they are great! There's just a gap in the way I shop and the way my husband shops. He has to have a definitive list, with every detail on it, or he will not pick up what might be missing in a future recipe. Like, I might see quinoa on the grocery list, and I will immediately know that I want to make quinoa-tabouleh salad and, even if the remaining ingredients aren't on the list, I still know what else to grab. He doesn't shop like that. But that's okay because, really, the wonderful thing about it all this shopping business is that it often forces me to be creative, and it is this exact thing that most often helps me to create new recipes. Like this southwestern version of my quinoa-tabouleh salad. I wasn't sure that cilantro was going to taste good with quinoa, but when I found three full bunches of cilantro, which is easily my favorite summer herb, in my fridge, I knew I had to find more ways to use it than just slapping it into my homemade pico de gallo. That's where this new quinoa salad comes in. It was really light and delicious, oil free, and perfect for any end-of-summer shindigs you might attend.

2 cups vegetable stock
1 cup quinoa
1 large ear corn, roasted (I roast mine right on the gas burner)
2 cloves garlic, minced
Big handful of cilantro leaves (about half a bunch), coarsely chopped
Juice from one large lime
Salt and pepper, to taste
  • Bring vegetable stock to a boil. Add quinoa. Stir, reduce heat and allow to simmer (stirring occasionally) until quinoa is soft. Set aside and allow to cool.
  • Use a sharp knife to saw the kernels off of your corn. Don't cut yourself!
  • Add all ingredients to quinoa. Stir well. Cover and refrigerate.
  • Enjoy! 

February 9, 2012

Easy Bean Salad


I've been looking for recipes with lots and lots of protein lately because, as always, I am struggling with flagging energy. Lack of energy (regardless of what I eat, it seems) is my biggest health complaint, and has been for about the past two years. I know I need to lose weight and exercise more - it's no mystery. But finding the energy to exercise more is kind of a problem! Ya know, it's just a big downward spiral... But I'll get there, I swear!!

So, Katherine from Plant-Based Health (who has become my unwitting health guru) recommended I eat beans for breakfast to get the protein boost that I once got from eating eggs in the morning. I haven't tried it yet - tomorrow with be the first time - but I'm really interested to see how I feel after I eat this beautiful and colorful, high protein salad first thing in the morning!
This is a recipe from The Cancer Survivor's Guide: Foods That Help You Fight Back, the book that is used to accompany the nutrition classes taught by The Cancer Project. If you don't already have this book, get it! It's chock full of great information about cancer prevention through diet. And it's the perfect book to help convince a non-believer!

I cut and pasted the recipe directly from the Cancer Project's recipe page, but I found the recipe as-is to be very bland. So, just between you and me, I added a half a bunch of coarsely chopped fresh cilantro, as well as some paprika, garlic powder, Black Gomasio, and lime juice. Enjoy!

1/2 cup low-fat or fat-free Italian salad dressing
1 15-ounce can kidney beans, drained and rinsed
1 15-ounce can pinto beans, drained and rinsed
1 15-ounce can black-eyed peas, drained and rinsed
1 10-ounce package frozen lima beans
1 cup frozen corn, thawed completely
1 large red bell pepper, seeded and diced
1/2 medium red onion, diced
1 teaspoon salt, or to taste
1 teaspoon black pepper, or to taste
  • Toss all ingredients together. Serve cold or at room temperature.
  • Place leftover bean salad in a covered dish and store in the refrigerator for up to three days.
  • Makes 10 servings.
NUTRITION INFO (per serving):
Calories: 183 / Fat: 3g (Saturate Fat: 0.5g, 14.6% Calories from Fat) / Cholesterol: 0mg / Protein: 9.9g / Total Carbohydrates: 31g (Sugar: 2.9g, Fiber: 8g) / Sodium: 539mg / Calcium: 43mg / Iron: 2.7mg / Vitamin C: 36.7mg / Beta Carotene: 311mcg / Vitamin E: 0.8mg

January 9, 2012

Gluten-Free Hot Fudge Brownies


Okay, I know this picture looks like a plate full of steamy hot you-know-what, but trust me, it's really a plate of gooey awesomeness. Hear me out...
I have yet to bake a single recipe in the New Dawn Kitchencookbook that I haven't gone ga-ga over, and this one is no exception. As usual, I craved a sweet treat. And my daughter was begging me to make a bowl of buttercream frosting for her to eat. Ummmm... I don't think so! My pantry is seriously looking deserted right now, so I wasn't sure what - if anything - could really be concocted from the confines of it's barren recesses. So, I started digging through my cookbooks to see if I had any remotely viable options, and after a few minutes of leafing through cookbook pages, I stumbled across the 'Hot Fudge Brownies' recipe in Dawn Grey, PhD's fantastic (but self-published and therefore not widely known) cookbook New Dawn Kitchen: Gluten-Free, Vegan, and (easily) Sugar-Free Desserts. It was the strangest recipe for brownies I've ever made. And I will admit that I was very skeptical when I was pouring boiling water over raw sugar and cocoa. I even exclaimed once, "What the hell am I making?!" But it turned out oh-so-scrumptious. When I took it out of the oven, the crusty top was pulsing with the hot fudge underneath, and little bubbles of fudge were popping in the cracks. It looked like a dream. I could only wait about five minutes before I had to dig in and taste it. Yes, I burned my tongue. Please try to exhibit more self-control than I did. The cookbook recommends that this be served warm, so I was just following instructions. Yes?

"2 cups All-Purpose Gluten-Free Flour
1/2 cup granulated sweetener (I used organic white sugar)
3/4 cup powdered cocoa
4 tablespoons baking powder
1 teaspoon salt product (I used fine sea salt)
1 cup chocolate milk product (I used Silk chocolate soy milk)
1/4 cup oil (I used canola)
1 tablespoon vanilla extract
3 1/2 cups boiling hot water, divided
2 cups packed brown granulated sweetener (I used brown sugar)
  • Preheat oven to 350 degrees.
  • In a large bowl, combine flour, white sugar, 4 teaspoons cocoa, baking powder and salt. Stir in milk, oil, and vanilla until smooth.
  • Spread into two 9x9" square baking pans (I used one 9x13" pan, lightly coated with baking spray). Combine brown sweetener and remaining cocoa into a separate bowl until blended, then sprinkle over the two pans equally.
  • Pour 1 3/4 cups hot water over each pan. For hot fudge effect, do not stir.
  • Bake for 35-40 minutes, until toothpicks come out clean. Rotate pans after 20 minutes. (I forgot to rotate - didn't seem to hurt.)
  • Best served warm with mock whipped cream or non-dairy ice cream."
  • Makes about 15 brownies.
NUTRITION INFO (per brownie):
Calories: 244 / Total Fat: 5.1g (Saturated Fat: 0.6g, Polyunsaturated Fat: 1.2g, Monounsaturated Fat: 2.4g) / Cholesterol: 0mg / Sodium: 559.8mg / Potassium: 192.4mg / Total Carbohydrates: 61.9g (Dietary Fiber: 3.2g, Sugar: 47.2g) / Protein: 2.9g

January 7, 2012

A Big Fat Bowl of Comfort


Today has just been one of those crappy, ho-hum days where my sick, grumpy daughter is puking on everything in sight and the best thing on TV is Satan's School for Girls, starring Shannon Doherty (which, I'll admit, I am watching with perverse fascination). My cat's are whining. My kid is whining. Now I'm whining... I finally decided "enough is enough!" So, I set out to make some good old-fashioned comfort food. Sadly, my larder is pretty bare, but after a little digging I managed to piece together a delicious, and very nutritious, chili. And I'm happy to say that it turned out great! I'm working on my second helping as I type. Try it out - it's seriously good for what ails ya. Now it's time to go make some cupcakes and take a nap...

1 14-ounce package Ground Beef-style Gimme Lean, cubed
2 tablespoons oil
1 25-ounce can garbanzo beans, drained
1 15-ounce can kidney beans, drained and rinsed
2 kidney bean cans of water
1 28-ounce can diced tomatoes, drained
1 8-ounce can tomato sauce
1 vegetable bullion cube (no MSG)
1/4 teaspoon salt
1/2 teaspoon black pepper
1 teaspoon paprika
1/2 teaspoon chili powder
Pinch of cayenne pepper
  • In a cast-iron or non-stick skillet, heat the oil over medium, then gently brown the Gimme Lean on all sides. No need to be methodical with this, just keep tossing it all around with a spatula until all pieces are nice and brown and slightly crispy on the outside.
  • In a large pot, place all remaining ingredients. Stir well and heat to boiling. 
  • Reduce heat to medium-low. Add Gimme Lean, stir well, then cover. 
  • Allow to simmer for about 20 minutes.
  • Makes 8 servings.
NUTRITION INFO (per serving):
Calories: 244.9 / Total Fat: 5.2g (Saturated Fat: 0.8g, Polyunsaturated Fat: 1.6g, Monounsaturated Fat: 2.3g) / Cholesterol: 0mg / Sodium: 855.3 / Potassium: 250.8mg / Total Carbohydrates: 35.8g (Dietary Fiber: 10.4g, Sugar: 3.9g) / Protein: 14.4g

December 6, 2011

The Best Vegan Brownie You Will Ever Eat


Fudgy in the middle with a light layer of crust on top. Perfection! I've been tweaking and re-tweaking this recipe and I think I've found the perfect combination of ingredients to create brownie awesomeness. Oh yes, brownie awesomeness.
This recipe is for the basic brownie, but feel free to play around with it - top with walnuts, stir in some chocolate chips, or add some mint flavoring to the mix and sprinkle crushed peppermint sticks on the top to spice it up for the holidays.
And get ready! For what, you ask? For brownie awesomeness.
Yeah, you heard me.
BROWNIE. AWESOMENESS.
Make these right now. Trust me.

1/2 cup canola oil
2/3 cup water
2 cups granulated sugar
2 tablespoons flaxmeal
2 teaspoons pure vanilla extract
1 cup all purpose flour
1 cup whole wheat pastry flour (or sub another cup all-purpose flour)
1 cup unsweetened cocoa powder, sifted if lumpy.
1 teaspoon baking powder
1/2 teaspoon salt
  • Preheat oven to 350 degrees.
  • Grease and flour (or use baking spray in) a 9x13" baking pan.
  • Whisk together all dry ingredients in a medium bowl and set aside.
  • In a large, separate bowl beat together oil, water, sugar, vanilla, and flaxmeal on medium speed until very well mixed. 
  • Add dry mixture to wet. Stir or beat on low speed until just-mixed and smooth. Do not overmix, but don't undermix either. The batter will be thick but smooth.
  • Spread mixture evenly into your baking pan. 
  • Bake on middle oven rack for 25-30 minutes. Test with finger (don't burn yourself!). Top should be crusty, but innards should still have a little bit of "give."
  • Makes about 15 medium-sized brownies.
  • Enjoy!
NUTRITION INFO (per brownie):
Calories: 271.7 / Total Fat: 8.6g (Saturated Fat: 1g, Polyunsaturated Fat: 2.2g, Monounsaturated Fat: 4.5g) / Cholesterol: 0mg / Sodium: 111.3mg / Potassium: 99.5mg / Total Carbohydrates: 48.3g (Dietary Fiber: 4.6, Sugar: 26.8g) / Protein: 3.7g

Vegan Cookies Invade Your Cookie Jar
The 100 Best Vegan Baking Recipes
Flying Apron's Gluten-Free and Vegan Baking Classics

November 27, 2011

Review - PureFit Nutrition Bars

I was recently asked by the company that produces PureFit Nutrition Bars to sample and honestly review their product.
Free nutrition bars, you say? I'm listening...
The thing that really drew my interest was the fact that the website promotes these bars as "the all-natural, gluten-free and wheat-free, dairy-free, vegan, kosher, high in protein, diabetic-friendly, that tastes great nutrition bar." Wow! That meets all of my ideal criteria in one generously-sized bar! So, I just had to try them.

As I perused the nutritional information for the bars, provided on the PureFit website, I was really elated to find that each individual bar contains 18 grams of protein, but is only between 210-220 calories for the whole thing. You think high protein, you think fatty things like nut butters and the like, which generally means lots of ass-fattening calories. The first ingredient listed in the nutritional information is soy protein isolate, with soy nuts, almonds, and nut butters listed further down the line. They also make the claim, on their website, that all of their soy products are from non-GMO sources. Winning!

So, all of the criteria for a discerning, label-reading vegan are there. The big test remaining, then, was "Does it taste good?"
The answer is an overwhelming, "Yes!" And, trust me, I've tasted enough nutrition bars to know what a good one tastes like. The general consensus on most commercially produced bars is that the chalky texture and the list of creepy chemical ingredients, along with the over-inflated price, are usually enough to keep me and my family away from them. But these bars actually taste good. I have to say, I was honestly surprised by the smooth texture and the flavor. The ingredient list is short, and every item in it is recognizable, which is a wonderful thing in the world of nutrition bars. So, even if they tasted gross, I would have eaten them just for the nutritional value. But they weren't gross at all!

The company sent me one bar in each of the five available flavors: Peanut Butter Crunch, Chocolate Brownie, Almond Crunch, Berry Almond Crunch, and Granola Crunch. I will say that there really isn't much actual "crunch" to the bars with Crunch in the title, but they tasted great so I didn't mind.
I assumed that Almond Crunch and Peanut Butter Crunch would be my favorites, and they were good, but oddly I preferred the Chocolate Brownie and Berry Almond Crunch flavors the most. I say "oddly" because I generally don't like brownie-flavored and berry-flavored bars. If I were shopping for these on my own, I probably would have passed these flavors by, but they were my favorites! So, I'm really happy that I was able to sample them all first, and I didn't miss out on something so yummy.
My least favorite was the Granola Crunch. It wasn't bad, by any means. It was just my personal least favorite of the five flavors. It was more plain-tasting than the others, so if you're looking for something to pair with a sweet coffee, it might be just right!

If you want to try these bars yourself, you can purchase a sample pack at PureFit.com, containing a full size bar in each flavor, for only $9.95. You can also purchase 15-count boxes of each flavor at the PureFit website.

But, between you and me (this is "Bankrupt Vegan," after all), you can get the boxes at a bit of a discount on Amazon.com - here are the links...
PureFit Nutrition Bars - Chocolate Brownie
PureFit Nutrition Bars - Berry Almond Crunch
PureFit Nutrition Bars - Peanut Butter Crunch
PureFit Nutrition Bars - Almond Crunch
(I couldn't find Granola Crunch, so you're on your own with that one. Sorry.)

Give these bars a try. They are really yummy, full of good stuff, and give you a nice little burst of energy, which is really important if - like me - you are chasing a three-year-old around your house all day. I will definitely continue to enjoy these bars and I now rank them among my favorites, which include KIND Barsand, of course, the always fabulous Lara Bars.
And, just so you know, this is an honest review. If the PureFit Bar had sucked, I would have told you so. I'm just Irish like that.

Please CLICK HERE to read my full Disclosure Statement.

November 25, 2011

A Vegan Thanksgiving Feast


I hope everyone had a wonderful Thanksgiving Day yesterday! My mom wasn't able to visit, so it was just me, my husband and my daughter this year. It was also the first time I have ever been responsible for the entire meal, all by myself. I was a little bit nervous, but luckily I was able to veganize my mom's fantastic sweet potato casserole recipe, I made our old favorite Mac N Nooch recipe, along with some homemade bread, and I found some great packaged items to fill in the gaps. I completely forgot to roast the fresh organic corn I had bought, but oh well...

My pictures aren't too great, but you can get the idea. I took them in haste while my hungry family looked on with desperation in their eyes. They were all, "C'mon! Let's eat!" while I snapped away. I'm so mean.


MOM'S SWEET POTATO CASSEROLE
This stuff will change your life, I kid you not!

CASSEROLE
4 medium sweet potatoes, peeled, boiled, mashed and slightly cooled
1/4 cup vegan butter*
1/2 cup agave nectar (or brown sugar)
1/4 cup vegan creamer (I used Silk Hazelnut)
1 teaspoon vanilla extract
1/2 teaspoon ground ginger
1/2 teaspoon ground cinnamon
1/2 teaspoon ground nutmeg
TOPPING
3/4 cup date sugar (or brown sugar)
1/3 cup vegan butter, melted
2 cups walnuts, chopped
1/2 teaspoon ground cinnamon
  • Preheat oven to 350 degrees.
  • Put all casserole ingredients together in a large bowl and stir until mixture is creamy. *If your potatoes have cooled completely, you may need to pre-melt or soften your butter. But if your potatoes are still warm the butter will melt nicely as you stir.
  • Stir topping ingredients together in a separate bowl until all walnuts are coated.
  • Place the casserole mixture into a deep 8 or 10-inch circular casserole dish. 
  • Spread topping evenly across casserole.
  • Bake for 45 minutes.
  • Makes about 8 big servings.
  • Enjoy!
NUTRITION INFO (per serving):
Calories: 316.1 / Total Fat: 22.3g (Saturated Fat: 4.2g, Polyunsaturated Fat: 12.4g, Monounsaturated Fat: 4.7g) / Cholesterol: 0mg / Sodium: 102.3mg / Potassium: 179.4mg / Total Carbohydrates: 28.2g (Dietary Fiber: 2.8g, Sugar: 15.3g) / Protein: 3.8g


OUTRAGEOUSLY EASY BIG BREAD
This is my go-to bread recipe. I've been making it for years. It's so fluffy and delicious, and requires very little (if any) kneading. And if you have a Kitchen Aid mixer with a dough hook, it's even easier!
Go HERE for the recipe.


CREAMY MAC AND 'NOOCH' CASSEROLE
Fantastic, creamy mac and "cheese" with a crunchy topping you can't resist.
Go HERE for the recipe.


HERB STUFFING WITH ITALIAN SAUSAGE
I used Arrowhead Mills Organic Savory Herb Stuffing. I prepared it as directed on the bag, but it came out a bit dry, so I added a quarter cup of melted butter. Once I poured some gravy on top, it was perfect!
I also lightly browned some of Tofurkey's fantastic Italian sausages and tossed them into the stuffing. It made a great "meat" entree for our table.

MASHED POTATOES WITH VEGETARIAN CHICKEN GRAVY
These mashed potatoes were so easy and really tasty! I purchased them at a health food store for only two dollars a box. Nice!


DESSERTS
I purchased three delicious pre-made pies from Sprouts Farmer's Market. We didn't go with the traditional pumpkin and sweet potato pies because I was doing this whole shindig all by myself (next year I'm going to look into pre-making and freezing homemade pies), but the cherry, strawberry with rhubarb, and dutch apple pies I snagged at just $3.99 each were totally vegan and absolutely delicious.


Well, I hope this gives you some inspiration for your next big holiday feast. See you at Christmas!