Showing posts with label lunchtime. Show all posts
January 27, 2016
Triple Protein Power Wrap
Feeling peckish, friend? Try this triple protein wrap and you will perk right up! It couldn't be easier. Just get the following stuff together and wrap it up into a little burrito of awesomeness.
Large tortilla, warmed on the stovetop
Your favorite hummus
Several medium tomato slices
A handful of lettuce
A handful of sunflower seeds
A handful of your favorite nuts (I used pecans)
Your favorite salt, pepper, herbs and spices*
*I used the Everyday Seasoning from Trader Joe's. It's so yummy! (And cheap.) If you don't have a Trader Joe's in your neighborhood, you can put together something similar on your own. The Everyday Seasoning contains sea salt, mustard seeds, black peppercorns, coriander, onion, garlic, paprika and chili pepper.
Sweep the hummus on your tortilla, then top the whole thing like a pizza. It should look something like this.
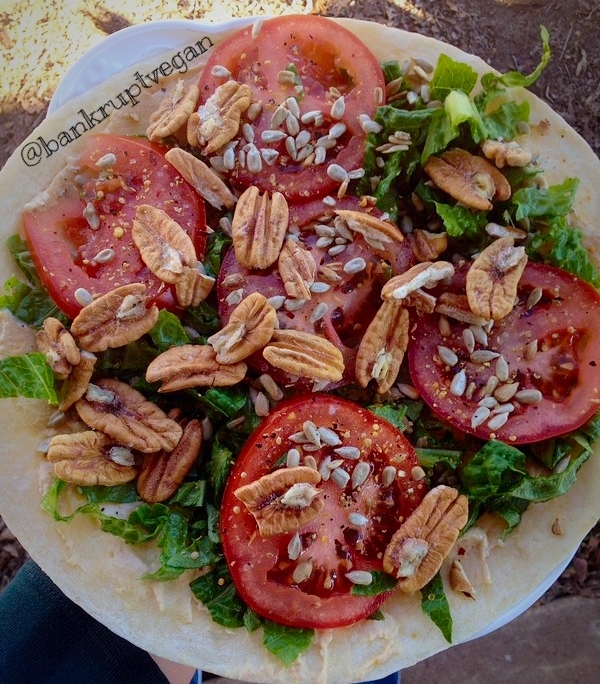
Then carefully, and as tightly as you can, roll it up into a lovely wrap. Cut in half and enjoy! Taste great with a kombucha or an iced tea!
November 4, 2014
Easiest, Yummiest Mac and Cheese
It's finally Autumn in North Texas, my favorite time of year! After another brutally hot summer, it's finally cool enough to open the windows and let some crispy fresh air come inside. Even better, it's pouring down sweet, much-needed rain right now. I have the house to myself. And I'm catching up on both my cleaning and my Netflix queue. It's a great day! Of course, a great day like this calls for some comfort food. I made chocolate oatmeal energy balls last night, so sweets are covered. The only thing missing is something cheesy. Enter the Easy Vegan Macaroni and Cheeze recipe from the Fat Free Vegan Kitchen. I just did a quick Google search for "the best" vegan mac and cheese and this is what popped up. Oh, and guess what? It's absolutely delicious! Creamy and "cheesy," even better than the boxed stuff - vegan or otherwise. Give it a try. It's perfect for this Fall weather, and I'm 99.99% certain that I will be serving it on my Thanksgiving table this year.
EASY VEGAN MACARONI AND CHEEZE
(recipe by Susan Voisin, who writes at blog.FatFreeVegan.com)
"Besides being low-fat, this recipe is also low in sodium, so salt-lovers may need to add salt. The tahini adds a little fat but a lot of flavor; still, leave it out if you need a completely oil-free dish.
Ingredients
- 1 pound pasta (regular or gluten-free), cooked according to package directions
- 1 1/4 cups water
- 1 cup plain, fat-free soymilk (may use other non-dairy milk)
- 3/4 cup nutritional yeast
- 3 tablespoons cornstarch or potato starch
- 1 tablespoon lemon juice
- 1 teaspoon salt (or more to taste)
- 1/2 teaspoon garlic powder
- 1 teaspoon onion powder
- 1/2 teaspoon dry mustard
- 1/2 teaspoon smoked paprika
- 1/2 teaspoon turmeric
- pinch cayenne pepper
- 2 tablespoons tahini (optional, but lends creaminess and flavor)
- 1 teaspoon mellow white miso (or additional salt)
- black pepper to taste
Instructions
- Put the pasta on to boil, according to package directions. While it’s cooking, blend water and all remaining ingredients together in a blender. When the pasta is al dente, drain it, reserving about 1/2 cup of the cooking water, and return the pasta to pan. Add the sauce mixture and cook, stirring, until mixture boils and thickens. Add a little of the pasta water if more moistness is needed.
- If the sauce is not as flavorful as you’d like, add a little more mustard and onion powder.
Number of servings (yield): 8
Makes 8 servings. Per serving: 303 Calories (kcal); 4g Total Fat; (10% calories from fat); 15g Protein; 54g Carbohydrate; 0mg Cholesterol; 316mg Sodium; 5g Fiber. Also, if you use nutritional yeast fortified with B-12, one serving provides 100% of the daily requirement of that vitamin."
October 23, 2014
Yellow Yum-Yum Soup
This soup was born from a soul-stirring need to have soup, despite having only a few standard soup ingredients on hand. Like, I just NEEDED to eat some salty, hot, delicious soup. And I would stop at nothing to get it.
Even if it meant that I pulled a bunch of random stuff out of my pantry and threw it into a huge pot, salted and spiced it and then ate it up. Which is what I did. And you know what? It turned out really amazingly good! I got lucky this time. This ain't my first rodeo, and I know what tastes good, but sometimes my pantry raids turn out terribly. This soup, though, was delicious, and has now been dubbed "yellow yum-yum soup." My kid and my husband loved it!
YELLOW YUM-YUM SOUP
1 15-ounce can coconut milk
2 cans vegetable broth (using the coconut milk can)
1 head of green cabbage, thinly sliced into ribbons
1 15-ounce can white beans, any kind (I used great northern)
2 cubes yellow curry
1/2 teaspoon paprika
1/2 teaspoon dried basil (fresh Thai basil would be even better!)
Dash of turmeric
2 tablespoons lime juice, or more to taste
Salt and pepper, to taste
A couple of sprinkles of sesame oil, optional
- Put the coconut milk and broth into a medium to large-sized pot. Heat and stir until just boiling.
- Add all remaining ingredients.
- Simmer over medium-low heat until cabbage is just starting to get soft. About half and hour.
- Adjust spices to taste. I like an obscene amount of lime juice.
- Serve hot.
- It's just that easy!
September 30, 2013
What's For Lunch?
Hello strangers! I've been away a while, and I apologize for not keeping up the housekeeping around here. But I have a great excuse... I got a job! I am now the Administrative Assistant (which is just a fancy way of saying "secretary") for a darling little Methodist church here in Fort Worth. It's only part-time, but you know the Bankrupt Vegan will take whatever work she can get! So, that's been keeping me busy for the past three months. And I really, really love the job - it is truly tailor made for me. The only caveat is that I have literally gained more than twenty pounds since I started the job. Bad, bad, bad... My tight clothes make me feel like a hot sausage about to pop, and there's a huge mirror on the wall right next to my office. Can anyone say, "juicy booty?" Yep, that's what I've got, and I don't mean that in a good way.
Not only have I been eating a lot of delivery and take out for lunch at work, but I'm always desperately starving in the afternoon when I get off work. And, hey, Taco Bell is on the way home! And the bean burritos are vegan when ordered fresco-style. Ugh...
So, now (meaning today) I've started taking healthy lunches to work. Here's what I had for lunch today....
So, my question for you guys is this: If you're a brown-bagger, what do you take for lunch every day? Or what do you pack for your kids' school lunches? I need ideas! And I seriously need to lose weight. So, keep that in mind when making your recommendations. I don't mind make-ahead and hot meals. There's a kitchen at the church where I can heat things up. Thank you, in advance!
P.S. Now that I'm all settled in to my new job, I will start posting new recipes really soon!
Not only have I been eating a lot of delivery and take out for lunch at work, but I'm always desperately starving in the afternoon when I get off work. And, hey, Taco Bell is on the way home! And the bean burritos are vegan when ordered fresco-style. Ugh...
So, now (meaning today) I've started taking healthy lunches to work. Here's what I had for lunch today....
| Quinoa Tabbouleh, Walnuts, Organic Raisins, a LARA BAR, and (not pictured) popcorn with Earth Balance and nooch. |
So, my question for you guys is this: If you're a brown-bagger, what do you take for lunch every day? Or what do you pack for your kids' school lunches? I need ideas! And I seriously need to lose weight. So, keep that in mind when making your recommendations. I don't mind make-ahead and hot meals. There's a kitchen at the church where I can heat things up. Thank you, in advance!
P.S. Now that I'm all settled in to my new job, I will start posting new recipes really soon!
June 2, 2013
I Can Finally Eat Basil. Life is Good.
| Look at those lovely, waxy leaves. They smell and taste as good as they look! |
Instead, I found some gorgeous tomatoes at Aldi, for super cheap. Big flavorful fatties in a four-pack, for a buck and some change. So, I sliced them up, spritzed them with a generous helping of balsamic vinegar, put a fresh basil leaf on each one, then topped them with a slice of cucumber and some black pepper. They were AMAZING! Light and full of the fresh flavors of summer. I am planning to serve these at every dinner party I throw from now until the end of time. Give it a try!
P.S. If you're not already growing your own basil, it's not too late!
Here's a great website with all the info you need to get growing.
http://www.growing-basil.org/
CLICK/SHOP/SUPPORT
THE COOKBOOK
appetizers,
brunch,
cooking with kids,
gluten-free,
Italian food,
kid food,
low calorie,
low fat,
low sodium,
low sugar,
lunchtime,
Mediterranean,
party food,
quick and easy,
salads,
sides,
snacks,
summer vegetables
May 17, 2013
Tempeh Bacon "BLT" Sandwich
I was recently skulking around on the Happy Herbivore's Facebook Group, "Herbie Parents" (great group of really sweet, supportive folks!) and I read a post wherein a pregnant vegan gal admitted to the group that she is having desperate cravings for deli meat, and might there be a yummy vegan replacement? Follow-up comments suggested all sorts of brands and types of faux meats that might fit the bill, but I don't like how overly-processed all that stuff is, so I suggested the Tempeh Bacon "BLT" I found recently on the Prevention RD website. It is sweet and smoky, and tempeh is fairly easy to come by at any veg-friendly grocery store. Plus, the recipe is a cinch! Just mix the marinade, pan fry the "bacon," and build the sammie.
It's the perfect meal for a Friday night at home with the family. I say that because this is what we had for dinner tonight - that very sandwich you see in the photo was snarfed greedily by yours truly only mere seconds after snapping this picture. I paired it with a side of cut fresh fruit and cucumbers mixed with fresh chopped mint leaves (straight from my garden) and fresh-squeezed lime juice. It was so good! My husband said of the sandwich, "I could eat about three more of these." High compliment from the man of the house! And my daughter said, pulling the tempeh ever so slightly out of the sandwich and eyeballing it with curiosity, "What is this stuff? It tastes good." She's four, so... you know that's pretty high praise.
Here's the original recipe from Prevention RD:
"Tempeh 'Bacon':
5 oz tempeh
2 Tbsp maple syrup*
1 Tbsp olive oil
1 tsp liquid smoke
1 tsp low-sodium soy sauce
1/2 tsp cumin
1/2 tsp black pepper
a dash of cayenne
5 oz tempeh
2 Tbsp maple syrup*
1 Tbsp olive oil
1 tsp liquid smoke
1 tsp low-sodium soy sauce
1/2 tsp cumin
1/2 tsp black pepper
a dash of cayenne
To assemble:
6 slices of whole grain bread
1 tomato, sliced
6 large lettuce leaves
3 Tbsp light mayonnaise
6 slices of whole grain bread
1 tomato, sliced
6 large lettuce leaves
3 Tbsp light mayonnaise
- Slice tempeh into about 6 oblong strips.
- Combine maple syrup, olive oil, liquid smoke, soy sauce, cumin, pepper, and cayenne in a shallow dish. Soak tempeh in marinade for 2-3 minutes, turning to coat.
- Turn a saute pan on medium-high and spray with non-stick cooking spray. Add the tempeh to the pan in a single layer and cook 1-2 minutes on each side, or until browned.
- Build three sandwiches with 1 tablespoon mayonnaise, 2 lettuce leaves, tomato slices, and about 2 slices of tempeh. Serve immediately. Yield: 3 servings.
- Nutrition Information (per serving): 408 calories; 16 g. fat; 5 mg. cholesterol; 583 mg. sodium; 55 g. carbohydrate; 12 g. fiber; 16.7 g. protein
- Result: Sweet and salty tempeh make this BLT a much more nutritious option. Healthy fats and lots of fiber make for a filling, heart-healthy sandwich. The tempeh bacon takes about 10 minutes to prepare and cook, so this meal comes together in a jiff! Enjoy!"
*I don't know about you guys, but I straight-up cannot afford maple syrup. For this recipe, I subbed some organic raw agave nectar that I got on a deep sale at Sprouts. OR, you can use use this recipe for Homemade Maple Syrup if you're really broke. --Jen
CLICK/SHOP/SUPPORT
May 10, 2013
Homemade Flour Tortillas
Welcome Vegan Potluckers!
As part of the Virtual Vegan Potluck blog tour this year, I am happy to be a part of the "Bread Course." At first I was going to make the huge loaves of bread that I put into my Thanksgiving meal a couple of years ago, but then I would be forced to butter and consume said loaves, which might not do flattering things to my arse. So, since avocados were on sale at three for a dollar last week, and I have a ton of them to eat, I thought to myself, "Tortillas! Yes, tortillas!" They are perfect for dipping into AwesomeSauce (we have seriously made a meal of this), or slathering with guacamole (again, a full meal of just this), or my favorite thing of all - a wrap consisting of guacamole, alfalfa sprouts, and halved cherry tomatoes. It doesn't sound like much, but it's seriously amazing. And, between you and me, you will BM like a soldier for the rest of the day after you eat it. Woo hoo!
HOMEMADE FLOUR TORTILLAS
4 cups whole wheat pastry flour (can sub all-purpose flour)
1 tablespoon baking powder
1 teaspoon salt
1/2 cup oil
1 1/2 cups cold water
| Pinch off a piece of dough no larger than the cup of your palm, and roll it into a ball. |
| Lightly flour your rolling surface, as well as your rolling pin. Roll out your dough ball, getting it as thin as possible. |
Place rolled dough onto a hot ungreased cast iron griddle.
Allow to lightly brown on both sides.
I like to roll out my next dough ball while the first is cooking.
Repeat until all your balls are rolled flat and cooked up right.
| Enjoy! |
![]() |
| www.passtheveggies.com |
![]() |
| www.themisfitbaker.com |
July 4, 2011
Baked Butternut Squash Sticks
HAPPY 4TH OF JULY!
Now I know you may be thinking, "Butternut squash fries?! Why, God, why???" But there is no need to consult your maker on this one. These baked "fries" are delicious, and abundantly nutritious. Plus, they're easy to make - and it's really fun to dig into a weird looking squash. For added chuckles, let your guests' kids spoon all the seeds out for you, and then chuck the gooey innards at their slightly-hammered parents. That's 4th of July in nutshell right there. Ahhh, sweet Americana...
1 large butternut squash
1 tablespoon extra virgin olive oil
1 teaspoon paprika
1/2 teaspoon onion powder
1/2 teaspoon garlic powder
Pinch of chili powder
Dash of cayenne (optional)
Salt and black pepper, to taste
- Preheat oven to 450 degrees.
- Use a vegetable peeler to carefully peel the rind from the squash. Keep peeling until all the little green lines have disappeared.
- Cut the squash in half lengthwise and use a metal spoon to scoop out the seeds and all that other goopy stuff.
- Now, cut the neck off of the squash and cut large wedges, as equal in size as possible.
- You can do the same with the "bowls" of the squash or you can save those for another recipe. Stuffed butternut squash, anyone?
- Toss your wedges and spices into a large bowl that has a tight-fitting lid.
- Secure the lid and shake the wedges around until they are all well-coated.
- Place in a single layer on a large, lightly-oiled baking sheet.
- Bake for 10 minutes. Flip the fries over, and bake another 10-15 minutes, until outside is crisp and inside is soft.
- Makes 4 servings.
- Enjoy!
April 30, 2011
Quinoa Tabbouleh Salad
This is my newest addiction. It is so good! I have always loved tabbouleh salad, even long before my health journey began. A plate full of falafel, tabbouleh, and dolmas was, and still is, one of my very favorite meals. So, when my husband and I decided to try gluten-free for a while, I assumed that I would have no choice but to give up my good friend, tabbouleh. But, now I don't have to! I found a delicious substitute for the bulgur wheat - quinoa! It tastes wonderful, and adds a lot of extra nutritional value toward your daily protein goal.
And, hey, remember all that fresh mint I told you about in my garden? Well, I have fresh Italian parsley growing out there too. So, badda bing. Scrumptious tabbouleh is mine once again! Give it a try.
1 cup uncooked quinoa
2 cups water
4 green onions, chopped
1 tomato, diced
1/2 large cucumber, diced
1/4 cup loosely packed fresh mint, finely minced
1/8 cup fresh parsley, finely minced
3 tablespoons olive oil
1/4 cup lemon juice, or less (to taste - I like a lot!)
1 teaspoon garlic powder
Freshly cracked black pepper, to taste
- Bring water to a boil in a medium saucepan. Add quinoa and stir. Cover and reduce heat. Allow quinoa to simmer on medium-low heat until all water is cooked off, about 20 minutes. Stir occasionally. Be careful not to burn your quinoa. Allow to cool.
- Place cooled quinoa into a large bowl (preferably something with an airtight lid).
- Add all remaining ingredients and gently stir until very well-mixed. Cover and refrigerate for at least an hour.
- Stir again before serving.
- Can be stored, covered, in the refrigerator for two or three days. But it's best on the first day, when the veggies are still fresh and crisp!
- Makes about 6 servings.
- Enjoy!
NUTRITION INFO (per serving):
Calories: 192.6 / Total Fat: 8.8g (Saturated Fat: 0.9g, Polyunsaturated Fat: 0.6g, Monounsaturated Fat: 5.0g) / Cholesterol: 0g / Sodium: 6.8mg / Potassium: 97.1mg / Total Carbohydrates: 24.6g (Dietary Fiber: 3.7g, Sugars: 2.1g) / Protein: 4.7g / Iron: 18.3%
March 31, 2011
Sweet Chili Carrot Fries
Looking for a novel new way to eat your carrots? Look no further than these Sweet Chili Carrot Fries! Easy to prepare, and baked in a jiff, they are the perfect after-school snack. They also make a great side to veggie burgers and tofu dogs. I served them with Tofu Florentine last night, and the whole family loved them. Delicious!
1 tablespoon olive oil
1 teaspoon salt
1 tablespoon agave nectar
1/2 teaspoon paprika
1/2 teaspoon onion powder
1/2 teaspoon garlic powder
1/4 teaspoon chili powder
Black pepper, to taste
- Preheat oven to 425 degrees.
- Place the carrot sticks in a large Tupperware bowl that has a tight-fitting lid.
- Pour oil and remaining ingredients into the bowl, on top of the carrot sticks.
- Secure the lid and shake the ingredients around vigorously until every last carrot stick is coated with flavor.
- Place the carrot sticks, in a single layer, on an ungreased cookie sheet.
- Bake for about 15 minutes. Check the carrot sticks, shake the pan, flip them around, whatever you need to do.
- Continue to bake for an additional 5-15 minutes, until carrot sticks are soft in the middle but nice and crunchy around the edges. Watch them closely.
- Makes 4 servings.
- Enjoy!
March 14, 2011
Spicy Rice and Vegetable Stew
Most financial experts would advise a gal on a tight budget (like yours truly) to plan a menu, and a consequential shopping list based on that menu. They'd tell me, "Stick to your menu. Do not buy more than that, and you'll be good to go." But I don't work that way. Really, the only gauge I shop with when I head to the grocery store is the stack of coupons in my hand matched by what's already on sale. I carefully peruse grocery store websites, newspaper inserts, and coupon booklets to find what deals I can stack on top of each other for the best prices. I have turned it into my scientific specialty, and I very often end up saving more than I spend. And that, my friends, is how I stock my kitchen. With that being explained, this particular stew came about by what I found on sale at the market last Friday. I found a varietal bag of organic frozen mushrooms on clearance, organic spinach on its last legs at a great price (it was still gorgeous), and vegan Italian sausages on sale for half-price at Kroger. I already had an abundance of brown rice, and I had a coupon for organic tomato sauce. Sooo... voila! Meet my Spicy Rice and Vegetable Stew, an idea born from the standard tomato-based beef stew recipe and sweetened with an extra jolt of hot and spicy!
1 cup water (plus one can full, later)
1 medium white onion, diced small
3 cloves garlic, minced
10 large spinach leaves, chopped
1 cup mushrooms, sliced (I used a variety of frozen mushrooms)
1 cup broccoli florets (I used frozen)
1 large carrot, peeled and thinly sliced
1 15-ounce can tomato sauce
1 1/2 cups cooked long-grain brown rice
1 package of your favorite vegan "meat" (I used sliced Italian sausages)
1/4 teaspoon paprika
1/4 teaspoon chili powder
A few shakes of liquid smoke, if ya got it
Dash of cayenne
Salt and pepper, to taste
- In a large skillet, saute onions, carrots, and garlic in 1 cup of water over medium heat until soft. Most of the water should be cooked off before you proceed.
- Add tomato sauce. Fill tomato sauce can with water, and add that too. Stir well.
- Add in your pre-cooked rice, and stir again. Cover and allow to simmer over medium-low heat for a few minutes, until everything is equally hot through and through, and well mixed.
- Add your choice of "meat." I like to use vegan Italian sausages, but ground beef substitute works well too. I've never tried it with a chicken substitute, but I think that might work too! If you're using sausages, I suggest you slice and pre-cook them in a cast iron skillet until they are lightly brown and crispy on the sides, but this is not absolutely necessary if you're in a hurry.
- Add remaining veggies, starting with the spinach, then the mushrooms. Put the broccoli in last - try to keep it from getting overcooked and soggy. You might even want to save it until the very last step.
- Add remaining spices, to taste. Cover and simmer for 5 to 10 minutes.
- Makes 8 servings.
- Enjoy!
March 1, 2011
Quinoa with Adzuki Beans
I've been in kind of a kitchen rut lately. I've mostly been eating salad, with the occasional treat of Daiya nachos. (Remember, I bought 20 bags of Daiya at a dollar a bag several weeks ago? Yeah, maybe 20 bags was a little ambitious. Thank God it freezes!) So, the last time I went to the grocery store I felt drawn to some of the weirder offerings, particularly ones that didn't blow my budget. I decided on a bag of Garbanzo Bean Flour
I haven't tried the garbanzo bean flour yet, but I cooked up the adzuki beans a couple of days ago, mixed them with some quinoa and spices, sizzled up some veggie bacon for garnish, and the whole family has been eating on this one batch since then! My husband just had a big bowl for lunch. It's the high-protein dish that just keeps on giving. Try it out for yourself!
5 1/2 cups water, separated
1 cup adzuki beans
1 cup quinoa
1 onion, finely diced
4 cloves garlic, crushed and finely minced
2 tablespoons low sodium soy sauce
1 tablespoon paprika
1/2 teaspoon fine sea salt or table salt
1/2 teaspoon black pepper
4 strips vegan bacon, cooked and cut into small pieces, for garnish (optional)
- Start your beans the day before you actually want to make the dish. You will need to soak them overnight in three cups of water. The next day, drain and rinse the beans, add a fresh 3 cups of water, and set them to cook over medium-high heat. Once they're boiling reduce heat to low and cover.
- For the quinoa, boil 2 cups of water. Add 1 cup of quinoa. Stir it around, cover and reduce heat. It only take about 20 minutes to cook. Once it's done, just shut off the heat and let it steam up while you finish your beans.
- While beans and quinoa are simmering, saute onion and garlic in half a cup of water, adding more water if needed to keep them from sticking. When onions are translucent and garlic is soft add them to the beans, stir in well, and re-cover the pot.
- Add all remaining ingredients, except bacon, and stir in well. Re-cover and allow beans to simmer at least an hour, until soft. You will have to do some taste-testing every now and again to see how they're coming along.
- When everything is ready, add the quinoa to the bean pot (or vice versa, depending on which pot is bigger) and stir it all around. I like to sing a little 'stirring song' while I'm doing it.
- Ladle beans into a bowl and top with bacon. It was also fantastic with nutritional yeast sprinkled on top! Green onions might be good too. Hmmmm...
- Makes 8 servings.
- Enjoy!
Calories: 142.7 / Total Fat: 1.6g (Saturated Fat: 0g, Polyunsaturated Fat: 0.1g, Monounsaturated Fat: 0g) / Cholesterol: 0mg / Sodium: 296.4mg / Potassium: 188.9mg / Total Carbohydrate: 24.1g (Dietary Fiber: 4.0g, Sugars: 1.6g) / Protein: 5.6g
*Nutrition Facts calculated without the optional bacon.
January 13, 2011
Simple Mung Bean Sprouts
Can't you just sense the "healthy" in this bowl? My mom bought me a 3-tray seed sprouter
This is a simple water-saute sprout recipe, perfect as a side to an Asian-inspired meal. Or pile it on top of rice and veggies for a complete entree! Either way, it's delicious and very healthy. Your body will thank you.
(A couple of friends hipped me to the water-saute, and it is saving me from so much fat in my meals! Thanks Molly and Katherine!)
Give it a try...
1/4 cup water
2 cups mung bean sprouts, rinsed
2 tablespoons low-sodium soy sauce
1 tablespoon agave nectar (or preferred sweetener)
1/2 teaspoon garlic powder
Pinch of salt
Splash of sesame oil (optional)
- In a large skillet or saute pan, place the water and mung bean sprouts. Saute over medium-high heat, stirring constantly, for a few minutes, until sprouts begin to soften slightly.
- Add remaining ingredients, saving sesame oil for last.
- Continue to cook over medium heat until more than half of the liquid at the bottom of the pan has cooked off. There will be a small amount of liquid left. Do not overcook. It only takes a few minutes. You don't want soggy sprouts!
- Cook until sprouts have softened, and soaked up some of your seasonings, but still retain their crunchy middles. Best to keep tasting them throughout the process.
- Makes one serving.
- Enjoy!
Calories: 142.3 / Total Fat: 1.0g / Cholesterol: 0.0mg / Sodium: 1315.2mg / Potassium: 7.7mg / Total Carbohydrate: 26.5g (Dietary Fiber: 2.1g, Sugar: 15.2g) / Protein: 2.1g
VITAMINS:
(For fun, and to prove the nutritive value of this dish, I listed vitamins too!)
Vitamin A: 4.0%, Vitamin B-6: 1.0%, Vitamin C: 20.2%, Calcium: 4.1%, Copper: 0.1%, Iron: 8.1%, Magnesium: 0.1%, Manganese: 0.2%, Phosphorous: 0.3%, Riboflavin: 0.1%, Selenium: 0.4%, Thiamin: 0.2%. Zinc: 0.1%
Look at all that Vitamin C!
And, while I have you here, check out my little alfalfa garden. Isn't it cute? Yum!
January 6, 2011
Simple Vegan Nachos to Daiya For!
I know, I know... We 'Bankrupt Vegans' can't afford Daiya cheese. And that hasn't changed. Daiya is expensive! Before today, I had never tried it. But, you will flip when I tell you that I found full-size bags of Daiya cheddar at the salvage store two days ago for one dollar each. One dollar! I bought ten bags! And I'm really glad I did because I fell in love with it at first bite.
Since that purchase, I have played with it non-stop. I've made no-turkey melts, chik'n nachos, and these delicious simple nachos that were soo, sooooo good. Now you might be saying, "Well, Jen, how on earth did you afford that fancy guacamole?" I'll tell ya! A few days ago, Kroger had organic Wholly Guacamole packs (normally around 5 dollars apiece) on a "Buy One, Get One Free" sale, and I had two different coupons for a dollar off, which I stacked to get two Wholly Guacamoles for only 3 bucks! Yep, we are livin' large at the Bankrupt Vegan house right now!
Make these super-easy nachos and see what I mean...
14 Baked Tostito's Scoops
1 white mushroom cap, sliced in thick pieces
1/4 cup Daiya cheddar
1/4 cup homemade or store-bought guacamole
- Preheat oven to 350 degrees.
- Put your Tostito's Scoops on a plate.
- Fill each Scoop evenly with Daiya cheddar. A little goes a long way, trust me!
- Put a slice of mushroom into each scoop, on top of the cheese.
- Bake for about five minutes, until the mushroom cap is nicely cooked and the cheese is melted.
- Remove from oven, and put a little pinch of guacamole into each Scoop.
- Makes one serving.
- This is, obviously, a very versatile and easy recipe. To liven it up, add Gardein chick'n pieces, LightLife Mexican style crumbles, roasted veggies, pico de gallo, or just about anything else.
- Enjoy!
Calories: 394 / Total Fat: 24.1g (Saturated Fat: 5.5g, Polyunsaturated Fat: 1.5g, Monounsaturated Fat: 1.0g) / Cholesterol: 0mg / Sodium: 615.7mg / Potassium: 56.5mg / Total Carbohydrate: 38.6g (Dietary Fiber: 9.2g, Sugar: 0.3g) / Protein: 6.6g
November 29, 2010
Creamy Bean and Roasted Pepper Chili
It's getting chilly outside and chilly weather makes me crave chili in my bowl. Ba-da-zing! But seriously, folks, I have an abundance of bell peppers and I love, love, love roasting them. They are so delicious. I also have an abundance of canned beans right now thanks to several coupons and a clearance sale. So, here's the end result of experimenting with all of that extra goodness in my pantry. And, trust me, just skip the spoon and scoop this stuff right onto a tortilla chip.
1 yellow bell pepper, roasted and diced
1 red bell pepper, roasted and diced
2 tablespoons olive oil
1/2 white onion, diced
3 cloves garlic, minced
1 15oz can black beans, drained and rinsed
1 15oz can pinto beans, drained and rinsed
1 15oz can diced tomatoes, drained
2/3 cup no-chicken broth, vegetable broth/stock, or water
1/4 cup nutritional yeast
1 tablespoon All-Purpose Seasoning (or your favorite savory seasonings)
1/4 teaspoon Fair Trade cocoa powder
Pinch of chili powder
Dash of cayenne
Salt and pepper, to taste
- Place your clean bell peppers over an open flame for roasting. I place them directly on the grill over my gas burner, one pepper per burner. Turn the flame on high and use metal tongs to rotate them occasionally, until the skin on all sides is charred black. Then immediately place the peppers into a bowl and cover them with a tight lid for about 15 minutes. While your peppers are "sweating" you can chop and saute your onion and garlic. After the 15 minutes are up, remove the charred skin from your peppers, de-stem and de-seed them, then coarsely dice them.
- In a large pot, heat the oil. Add onion and garlic, saute until tender.
- Add all remaining ingredients, including prepared peppers, and bring to a low boil. Reduce heat, cover, and simmer gently (stirring occasionally) until chili is warmed through and spices have had time to blend into the dish. I gave it about a half an hour, but you could probably dig in sooner if you're in a hurry.
- Makes 4 servings.
- Enjoy!
NUTRITION FACTS (per serving):
Calories: 207.0 / Total Fat: 1.3g (Saturated Fat: 0.3g, Polyunsaturated Fat: 0.2g, Monounsaturated Fat: 0.1g) / Cholesterol: 0.0 mg / Sodium: 376.0mg / Potassium: 877.1mg / Total Carbohydrates: 36.6g(Dietary Fiber: 12.4g, Sugars: 2.8g) / Protein: 15.2g
October 21, 2010
Carrot and Roasted Red Pepper Soup
I love red bell peppers, but they generally run at a cost of about $2.99 each, which I cannot afford. Three bucks for one pepper?! Nuh-uh.
But I was shopping at Kroger a few days ago and found a pack of nine gorgeous bell peppers (six red and three yellow) for only $3.99. Yippee!
So, here's a great soup I threw together from an abundance of carrots (it's the cheapest organic vegetable I can buy locally, so I use it as a base in a lot of my cooking) and my beautiful, affordable bell peppers. Give it a try!
5 large carrots, grated or sliced thin
1 large onion, grated or finely diced
2 to 4 cloves garlic (to taste), minced
2 large red bell peppers
2 cups veggie broth or no-chicken broth
2 cups unsweetened soymilk
2 teaspoons lemon juice
3 tablespoons all-purpose seasoning (I used Simply Organic)
Salt and pepper, to taste
Pinch of cayenne (optional)
Dollop of vegan sour cream for garnish (optional)
- In a large pot, combine carrots, onion, garlic, and broth. Heat to boiling, stirring occasionally, then reduce heat to medium-low. Cover and simmer until veggies are soft, about 15 or 20 minutes.
- While your base is simmering, roast the red peppers. If you have a gas range, I highly recommend roasting them directly over the open flame, using metal tongs to gently turn as needed. I place my peppers right on the stovetop, over a medium-high flame, and let them roast until the skin is almost completely blackened. If you don't have a gas range, you can roast them under the broiler. Take them out when skin is black. When they're nicely roasted and soft if you poke at 'em, place them in a bowl and cover for about 15 minutes. Then gently peel the blackened skin off, cut them in half and remove the stem and seeds. After that you can chop them up and add them to your pot.
- If you have a hand blender, I suggest you blend your base up right in the pot. If you don't, you can blend the soup in a regular blender, but you'll have to do it in batches. You can add a little of the milk to each batch if it's too thick to blend.
- Add remaining ingredients to pot (except sour cream) and stir until well-mixed. Then cover and simmer for 15 or 20 minutes, until spices have had time to nicely flavor the soup. Keep tasting, and add more of your favorite spices as desired.
- Top with a dollop of sour cream, and enjoy!
- x
Subscribe to:
Posts (Atom)