Showing posts with label kid food. Show all posts

April 3, 2017

Quick and Easy Tropical Sorbet


The story behind this homemade sorbet is fresh in my memory because:
a) it's short, and
b) it literally just happened twenty minutes ago.

My daughter was coming into the house, after playing outside for a while, and she banged her top lip on the metal door, giving it a little scrape and making it swell up. So, I told her I'd make her something cold to help the swelling go down. I thought I would whip up a smoothie real quick, but my blender was in the dishwasher getting hosed down. However, my food processor was clean and available! So, I swirled together a bunch of stuff that I found in my freezer and fridge and made a sorbet, not certain how it was going to turn out. But you know what? IT WAS DELICIOUS! I thought I'd hop onto the blog and share it with you guys before I forgot what I put in it - it's perfect for a cooling spring and summer pick-me-up. I put the leftover sorbet in popsicle molds. Can't wait to try those too!

This makes a lot, so halve the amounts if you don't want more sorbet than two to four people can eat in one sitting. Also, I'm just kind of memory-eyeballing the amounts here. I did not measure this. I just tossed stuff into the food processor and hoped for the best. It's just how I like to live my life.

1 cup frozen pineapple chunks
1 cup frozen peach slices
1 cup frozen nectarine slices
1 cup frozen strawberries
1 cup frozen mango chunks
1 cup ruby red grapefruit juice
3 tablespoons agave or maple syrup, or more to taste
1/2 - 1 cup non-dairy milk, to taste

  • Put everything except the milk into a large (I think mine is a 4-quart) food processor and start spinning on high. Gradually drizzle in the milk, just a few tablespoons at a time, to thin out the mixture to your desired consistency. 
  • Serve it up and enjoy!

October 3, 2016

Banana Walnut (or Choc Chip) Muffins


I'm sorry I haven't posted in a while, but I've started homeschooling my kiddo  and that is keeping me very busy! Gone are the days of solitude where I can clean house for a while and then cook and blog while the washer is running. But, that's okay, I love homeschooling and so does my daughter! But I'll still post when I can. In the meantime, I picked up a new-to-me cookbook called The 30-Day Vegan Challenge by Colleen Patrick-Goudreau (whose podcast, Joyful Vegan, is fantastic!) and I'm so excited about it that I wanted to share the first recipe I made from the book.

My daughter is 8-years-old and is obstinate about vegan food. Sorry, "vegangelicals," but she is very adamant that she does not want to eat vegan food and while I frequently encourage her to try it, I do not force her to eat only vegan. But, I am a sneaky redhead, so here's what I've been doing - I've been making vegan recipes and not telling her they're vegan and keeping tabs on the ones she really likes. So far, I've only been able to trick her with my three-bean chili. I use the Trader Joe's vegan ground beef substitute and she honestly hasn't noticed that it's not beef. Now, the reason I'm so excited about Ms. Patrick-Goudreau's cookbook is because it has lots of yummy-looking "kid food" in it, like mac and cheese, chocolate cake, and quesadillas, and when I showed my daughter the photos in the book she said, "Mmmm, that looks good! Get this cookbook." I never told her it was a vegan cookbook. I'll keep you posted on how she responds to the recipes.


This is the recipe for Banana Chocolate Chip Muffins, but I didn't have any chocolate chips, so I subbed chopped walnuts instead.

2 cups whole wheat pastry flour or unbleached all-purpose flour
1 1/2 teaspoons baking soda
1/2 teaspoon salt
1 cup granulated sugar
1/3 cup canola oil
4 ripe bananas, mashed
1/4 cup water
1 teaspoon vanilla extract
1 cup semisweet chocolate chips (or chopped walnuts)
  • Preheat oven to 350 degrees.
  • In a medium-sized bowl, mix together flour, baking soda, and salt. Set aside.
  • In a large bowl or stand-mixer, beat oil and sugar together. 
  • Add mashed bananas and mix.
  • Add water and vanilla. Mix again.
  • Use a spoon to gently stir the flour mixture into the wet mixture.
  • Fold in chocolate chips or walnuts.
  • Fill each muffin tin halfway with batter. (With the use of the Reusable Silicone Baking Cup Liners, I was able to get 20 muffins out of this batch.)
  • Bake for 20 - 30 minutes, until a toothpick inserted in a center muffin comes out clean.
  • Enjoy!

July 2, 2016

Vegan 'Puppy Chow'


Super easy to make, cheap, and delicious. Plus, it makes a ton! You can't go wrong with this stuff. It's a finger food, it's a kid food, it's an ice cream topping, it's a popcorn add-in, it's a pretzel mate, it's everything you dream of and more. There's no baking involved so feel free to let your kiddos get in on the preparation.

Here's what you'll need:

1 cup vegan semi-sweet chocolate chips
1/2 cup nut or seed butter of choice (I used sunflower seed butter)
1/4 cup vegan butter
1 12.8-ounce box of rice chex or crispix-style cereal
1 cup powdered sugar
  • In a double boiler, or in a metal or ceramic bowl placed over an inch or so of water, melt the chocolate chips, nut or seed butter, and vegan butter. Stir gently until smooth and well-mixed. 
  • Pour over cereal and gently stir, folding chocolate into the cereal, coating each piece. If you have a large Tupperware container with a tight-fitting lid, you can gently shake the mixture until everything is evenly coated. 
  • Once the chocolate has cooled slightly, go ahead and toss in the powdered sugar. Gently stir or shake again.
  • That's all there is to it. Enjoy!
P.S. We're experimenting with a hybrid of the gluten-free and Feingold diets to try to curb my daughter's ADHD symptoms before school starts back up. So, you'll be seeing lots and lots of gluten-free and low-salicylate recipes over the summer. If it works, you'll be seeing them indefinitely! Wish us luck. 

March 31, 2016

Beef(less) Mushroom Stroganoff


Sorry I've been slow to update the site, but I've got an exciting excuse! I used some of my tax return money to enroll in the Forks Over Knives cooking course, and it's been keeping me busy during my tiny bits of "computer time" each day. Next year I'm really hoping to enroll in the Plant-Based Professional course, and become a bona fide vegan chef. Maybe start earning money with my cooking? Yes, please! I'll keep you guys updated on my progress.

In the meantime, I'll post as often as I can. The FOK course ends in May, so I should be posting with more regularity by summer. Hang in there!

I was craving something classic, hearty, and old-school, so I pulled down the only non-vegan cookbook I own, which is called Jeanne Jones' Homestyle Cooking Made Healthy: 200 Classic American Favorites Low in Fat With All the Original Flavor. I freakin' love this cookbook. It's got all the classic American staples in it, and they're all sort of semi low fat, not that anyone cares about fat anymore, but if you could see the adorable photo of the author, a tiny little ol' lady named Jeanne, you'd fall in love like I did.

So, I cracked it open to a classic Beef Stroganoff recipe, and I veganized that bee. So, here's my version of Beef(less) Mushroom Stroganoff, adapted from the Jeanne Jones cookbook referenced above.

12 or 16 ounce bag of any wide, flat noodles
3 tablespoons oil or vegan butter
1 little carton of mushrooms, cut into quarters
2 cloves garlic, minced
1 onion, diced
2 bags of Gardein Beefless Tips*
2 1/2 tablespoons unbleached all purpose flour
2 1/2 cups vegetable or no-beef broth
3 tablespoons marsala wine ($3.99 for a huge bottle at Trader Joe's!)
1 tablespoon tomato paste
1 teaspoon paprika
1 teaspoon dried basil
3/4 cup vegan sour cream
Salt and pepper, to taste
Fresh parsley, finely chopped (to garnish)
*If you can't swing the cost of Gardein, sub two extra cartons of mushrooms.
  • Pre-cook your noodles in a large pot according to package directions, drain them, shock them by running cold water over them until they're totally cool, then put them back in the big pot and set them aside.
  • In a large, nonstick skillet, heat two tablespoons of the oil or butter over medium-high heat. Add garlic and onions and saute until just beginning to turn translucent, about 5 minutes. Add your mushrooms. Cook them only a few minutes more, stirring frequently, until they are just beginning to soften. Remove from skillet and set aside.
  • Heat the remaining tablespoon of oil or butter in the same hot skillet. Brown the outsides of your Gardein Beefless Tips, if using. When you're finished, dump the Gardein into the same bowl you have your onions, garlic and mushrooms in. 
  • In your same hot skillet, brown with goo from cooking (which is exactly what you want), place your flour. Slowly stir in the broth, whisking constantly, until the flour isn't clumped. Heat should be medium. Whisk in the wine, tomato paste, paprika, dried basil, and a few shakes of salt and pepper. Reduce heat to simmer and stir occasionally, until mixture thickens slightly. 
  • Turn off the heat and add the sour cream.
  • Pour the sauce into the large pot containing your pre-cooked noodles. Add the beefless tips (if using), mushrooms and garlic. Gently stir and mix everything together until all the noodles are coated with the sauce and the mushrooms and beefless tips are spread throughout.
  • When you serve the dish, top it with some fresh, finely chopped parsley. It's easy to grow, so you shouldn't have to buy it, but if you do have to buy it, it's cheap. And it's a showstopper that really elevates the look of the dish and freshens it up on your palate.
  • This makes about four really big servings, or eight small to reasonable-sized servings. We Texans like huge servings, so it's always hard for me to make a calculation on these things.
  • Enjoy!


March 4, 2016

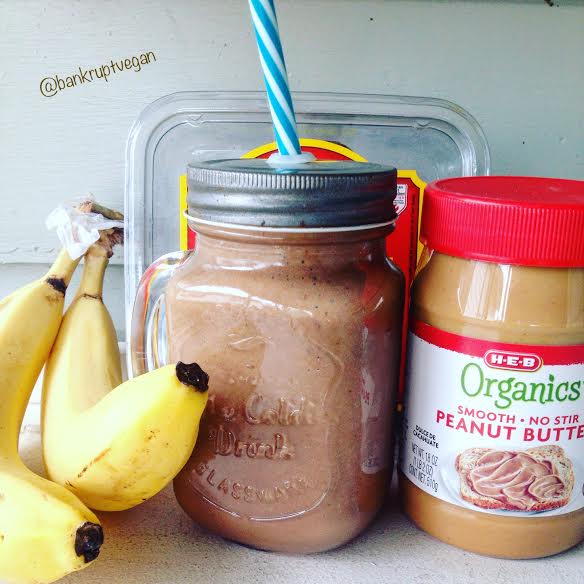
Chocolate Banana Peanut Butter Shake


It's already getting steamy in the great state of Texas. I started pumping the AC somewhere around mid-February, which means it's finally time for some cold drinks up in here! Enter this bad boy, the one containing the holy trinity of sweet flavors - chocolate, peanut butter, and bananas. Woot woot! Try it. You'll never be the same, friend.

2 ripe bananas
4 dates, pitted*
1 cup non-dairy milk
4 tablespoons smooth peanut butter
2 tablespoon cocoa powder
10 ice cubes, or more to taste

*Sometimes you can find dates at a decent price (Trader Joe's has them pretty cheap) and sometimes you can't. If your budget doesn't allow for dates, replace them with a liquid sweetener, like agave or maple syrup, about a teaspoon of sweetener for each date. Or just leave the sweet stuff out altogether! If your banana is ripe and your peanut butter has sweetener in it, you may not need extra sweetener at all. But if you can swing the dates, I highly recommend them. They add a lovely touch of natural sweetness to this drink. Some rum would be nice too...

  • Place bananas, dates (or liquid sweetener), milk, peanut butter, and cocoa powder into the blender and blend until nice and smooth. 
  • Add ice cubes, a few at a time, until cubes are crushed and drink is chilled.
  • Makes one large glass (think Mason jar) or two smaller glasses.
  • Enjoy!

February 9, 2016

Dreena's Best Banana Muffins


Almost four full years ago, I posted what I still consider to be the best vegan chocolate chip cookie recipe any of us will ever try. That recipe was the invention of Dreena Burton, and it's so wonderfully simple and chewy/crispy and perfect, I continue to make it at least once a month. My whole family loves it!

Dreena's gone and done it again in her new cookbook, Plant-Powered Families: Over 100 Kid-Tested, Whole-Foods Vegan Recipes. A couple of weeks ago, she posted a photo of the banana bread muffins from this new cookbook on her Instagram account, and it looked so good, I asked where I could find the recipe. She graciously responded that it's in her new cookbook and even gave me the page number. Lucky for me, I'd just bought the cookbook a few days prior to this encounter, and since all of the ingredients are things I already had on hand, I was ready to give this recipe a try. And I'm so glad I did! The muffins are chewy and lightly sweet, with the littlest hint of guilty-pleasure to them. Only you don't have to feel guilty! Seriously, they're just great. Give these a try, and when you're done go buy everything Dreena's ever published. Her recipes never fail.

P.S. Dreena did not put me up to this. I bought this cookbook with my own money and I'm raving about Dreena Burton of my own free will. You will too after eating these muffins!

P.P.S. In the cookbook, this recipe makes either a loaf of banana bread or twelve muffins. I'm only providing the info for the muffins, and I'm partially paraphrasing her recipe in my own words. So, the baking instructions you find below aren't exactly what's in the cookbook. Just lettin' ya know!

1 cup whole wheat pastry flour
3/4 cup oat flour
2 teaspoons baking powder
1/2 teaspoon baking soda
1/2 teaspoon cinnamon
1/2 teaspoon freshly ground nutmeg
1/4 teaspoon sea salt
1 cup pureed overripe banana
1/2 cup plain nondairy milk
1/3 cup pure maple syrup
1 teaspoon pure vanilla extract
3-4 tablespoons nondairy chocolate chips (optional)

  • Preheat oven to 350 degrees.
  • Grease a 12-cup muffin pan, or line with paper baking cups.
  • In a large bowl, mix the flours, baking powder, baking soda, cinnamon, nutmeg and sea salt. In a separate bowl, combine the pureed banana, milk, maple syrup, and vanilla extract. Add the wet mixture to the dry, then add the chocolate chips, and stir through until just well combined. Do not overmix.
  • Pour mixture into muffin cups (I used a large cookie scoop to measure out the batter). 
  • Bake for 17 to 20 minutes, or until a toothpick inserted into a center muffin comes out clean.
  • Let cool before eating.
  • Enjoy!
Before I go, let me tell you about the exciting new thing I'm doing! I've been thinking about the kind of career I want to start to build for myself at this stage of my life. When I was graduating from college with a Communications/Theatre BA, I couldn't possibly have known that in ten years I would be vegan and have an earnest interest in becoming a vegan chef, teacher, coach, and professional baker. So, at the ripe li'l age of 43 (my birthday was last Thursday!) I am taking my first steps in pursuing my dream. Step One, for me, is enrolling in a vegan cooking school to learn all the chef basics, tricks and tips. I just signed up this very morning, and I am so excited! I will keep you all posted on my progress as I proceed through the program.


November 3, 2015

Banana-Pecan Muffins


I hope everyone had a fabulous Halloween! We tried the "Switch Witch" thing for the first time this year. My daughter was able to go out and trick-or-treat like everyone else, but at the end of the night she left her candy out for Switch Witch, who swooped in while she was sleeping, took her garbage candy ("to feed to her naughty cat") and left, in it's place, good quality candy that I don't have to worry about her eating. No dyes, no preservatives, etc. It worked like a charm and my kiddo didn't have to feel left out of the Halloween festivities! The junk candy went to work with my husband who left it out in the breakroom for his co-workers. 

The morning after Halloween I made these fantastic muffins because I wanted to use the tons of pecans falling from the tree in my front yard right now! I seriously have three buckets full of pecans and at least three or four dozen more pecans fall from the tree every day. I love pecans, so I'm in heaven! I can't wait to make pies. If you don't have pecans, or they are too expensive, any nut will do. Or you can replace the nuts in the streusel topping with oatmeal, which is super cheap. Feel free to be creative!

Also, my daughter (who is a really picky eater) absolutely LOVED these! She ate two for breakfast, then came home after school and ate four more. If you have kids, you might want to make a double batch.

1 1/2 cups non-dairy milk (I used unsweetened almond)
2 teaspoons apple cider vinegar
2 2/3 cups flour (I used white whole-wheat)
1 1/2 teaspoons baking powder
1/2 teaspoon baking soda
3/4 teaspoon salt
2 teaspoons cinnamon
1/3 cup vegan butter, softened
3/4 cup granulated sugar (organic preferred)
1/4 cup vegan yogurt (I used unsweetened coconut yogurt)
1 teaspoon vanilla extract
2 large overripe bananas, mashed
1 cup pecan pieces
1/2 cup brown sugar (organic preferred)
  • Preheat oven to 325 degrees. Grease a 12-muffin tin or place paper liners in it.
  • In a small bowl, whisk the milk and vinegar together and set aside to allow it to curdle.
  • Beat butter and sugar together until light and fluffy, about two minutes or so. 
  • Add yogurt, milk and vinegar mixture, and vanilla. Mix well. 
  • Add bananas and mix again.
  • On top of your soft mix, dump the dry ingredients. Flour, baking powder, baking soda, salt and cinnamon. Then stir with a spoon or beat gently until well-incorporated, but take care not to overmix or your muffins will be tough.
  • Spoon the batter into your muffin tin, filling each cup almost to the top. I did two scoops into each cup with a large cookie scoop, and that worked perfectly. 
  • In a separate bowl, mix your nuts or oats with the brown sugar and spoon it onto the tops of your muffins. 
  • Bake for 15 to 20 minutes, or until a toothpick inserted into the center of a muffin comes out clean.
  • Enjoy!

October 12, 2015

Fresh No-Cook Spaghetti Sauce


In the mood for something fresh, light, easy and breezy? You have to try this amazing, no-cook spaghetti sauce! A few days ago, a friend of a friend on Facebook posted a video from Food & Wine magazine that I saved immediately because I just knew I had to try it. You just use a box grater to grate tomatoes into a bowl, add a few other ingredients, mix it with cooked pasta and you're good to go. I thought it must be too good to be true, but I tried it for dinner tonight and I'll be danged if it isn't delicious! Here's the video:


And here's my take on it:


16 ounces spaghetti noodles, cooked
6 to 8 large, ripe beefsteak tomatoes, cut in half
3 tablespoons olive oil (optional)
1/2 to 1 teaspoon salt, to taste
1/2 to 1 teaspoon garlic powder, to taste
1 teaspoon dried oregano
Handful fresh basil leaves, chopped


  • Grate the tomatoes into a large bowl with a box grater.
  • Add remaining ingredients, to taste, and stir. 
  • Toss with your spaghetti and serve.
  • Seriously, it's that freakin' easy.
  • Enjoy!


October 11, 2015

Portobello Sloppy Joe's

Hey friends! It's been a long time since I posted on this blog, but that's all about to change. If you followed my summer adventures on the blog, The Thinking Spoon, you will know that I had surgery to remove a rare and fast-growing 4.5x5cm tumor from my left breast. The surgery wasn't too bad at all, but I suffered severe bronchitis and a disgusting staph infection on my leg afterward. So, it's not been the greatest summer. I'm still weak and I've put on a lot of weight from all my time spent convalescing, but I'm finally starting to perk up. And I'm ready to reclaim my health! The recipes that I will feature from here on out will focus on maximizing nutritional benefits. I need to lose weight, get strong, and make darn sure I don't wind up with another cancer scare. I hope you'll come along with me and offer your support and suggestions along the way. I love hearing from you guys! So, let's get started with a new recipe in a new year from a new gonna-get-healthy Jen. 


In the South we like our Sloppy Joe's kind of sweet, with a maple-y BBQ flavor. If you prefer them more on the savory side, leave out the sugar and ketchup, and just add an extra tablespoon or so of tomato paste, along with some savory spices of your choosing. You can't mess this one up. Just taste as you go and you'll end up with something fun, yummy, and really, really messy on your plate, which is why they have the word "sloppy" right there in the title.
I topped mine with homemade pico de gallo, but I think pickled jalapenos or just straight-up lettuce and tomato would be nice too. My husband likes to spritz his with classic hot sauce and my daughter likes to eat hers on tortilla chips. You seriously can't go wrong. I hope you enjoy these!
<1 pound portobello mushroom caps, coarsely chopped 1 tablespoon extra virgin olive oil 1 large sweet onion, small dice 1 large red bell pepper, small dice 3/4 cup + 2 tablespoons cheap beer, divided
1/3 cup walnuts, finely chopped (optional, depending on your budget)
4 tablespoons tomato paste
1/4 cup ketchup
1 teaspoon sugar
A few drops of liquid smoke
Salt and pepper, to taste
6 hamburger buns
Toppings of your choice (homemade pico de gallo is pictured)

  • Whirl the mushrooms in batches in a food processor until very finely chopped, scraping the sides as needed to incorporate larger chunks. Don't pulse them so long that they liquify.
  • Drizzle oil into a hot cast iron skillet. Add the onions and cook until soft. Add 1 tablespoon of the beer and continue to cook for a few minutes more.
  • Add walnuts and red bell pepper to the pan, along with an additional tablespoon of beer, and cook until the pepper pieces are tender.
  • Add the mushrooms and cook until soft and well-incorporated.
  • Add all remaining ingredients, except buns and toppings (d'uh). Simmer uncovered, stirring occasionally, until the mixture reaches a taste and consistency that you like. Feel free to fiddle with the flavors, add some other spices, or jazz it up any way you like it. 
  • When you get it where you want it, turn off the heat and allow the mixture to rest a few minutes. It will thicken a bit as it rests.
  • Spoon onto toasted buns and top with your favorite stuff. 
  • Enjoy!

December 9, 2014

Autumn's Easiest Dried Apples


I know I'm a little late with this post. I actually made these dried apples and took this picture well over a month ago, but it's been busy around here. I vow, right now, to get back to posting more regularly! Now that I am jobless I seriously have no excuse. But I'm one of those moderately crazy OCD people who think they can accomplish nothing creative until their house is clean. So, I end up cleaning constantly, and never writing or exercising or anything else useful until my house is clean, which it never is, so you get my drift... My new year's resolution is going to be to let the house be messy and get my creative stuff done first! As I type, there are muddy dog prints on the carpet in the back room and a pile of dishes in the kitchen sink. I can't let those things haunt me. Let's get to the apples!

For this recipe you will need a dehydrator, and it does not have to be a fancy one. The dehydrator I used cost $20 (I got it at Aldi last summer) and it works great! And you don't have to have an apple peeler/corer combo, but it saves you an hour or more of peeling and chopping and helps to make sure all of your apples are the same thickness. I'm talking about one of these things...
(Affiliate link- Click the photo to be taken to the product.)


I recommend a stout, cast-iron body corer with a clamp (like in the picture) as opposed to a suction cup. Again, these run about $20.

Use a nice sweet, or tart, apple. I like to use Pink Lady apples. A Red Delicious, for example, might not make for a very flavorful chip. But a Jazz or Granny Smith would make a yummy chip for sure!

So basically, you just twirl your apple through this contraption and it takes the skin off (drying the skin makes it too chewy - trust me and take it off), cores the apple and spiral slices it all at the same time. What you have left is just the good "apple meat." Take a knife and slice it just once from top to bottom, which will leave you with a lovely stack of evenly sliced apple chips. Lay each chip in a single layer in your dehydrator. The sides can be touching, but it is very important that the apples not overlap one another.

If you're wondering about browning, don't worry. The first time I tried this, I was very concerned about whether or not I needed to dip my apples into a lemon juice solution (or something similar), but I read online that it wasn't necessary and I went for it. The apples you see in the photo have not been treated, or flavored, with anything. I just popped the raw apple slices right into the dehydrator and that was it.

Once your apples are set, turn on your dehydrator (mine does not have any particular settings, just a plug that turns it on and off) and let those babies crisp up over a twenty-four hour period, give or take a few hours depending on your machine. Rotate the layers every couple of hours or so. Make sure the apples are totally dry. If you take them out too soon and don't eat them right away they will spoil quickly.

Once they're done, allow them to cool at room temperature before storing them in an airtight container. Then enjoy! They are delicious and nutritious - and a perfect compliment to movie night.

November 4, 2014

Easiest, Yummiest Mac and Cheese


It's finally Autumn in North Texas, my favorite time of year! After another brutally hot summer, it's finally cool enough to open the windows and let some crispy fresh air come inside. Even better, it's pouring down sweet, much-needed rain right now. I have the house to myself. And I'm catching up on both my cleaning and my Netflix queue. It's a great day! Of course, a great day like this calls for some comfort food. I made chocolate oatmeal energy balls last night, so sweets are covered. The only thing missing is something cheesy. Enter the Easy Vegan Macaroni and Cheeze recipe from the Fat Free Vegan Kitchen. I just did a quick Google search for "the best" vegan mac and cheese and this is what popped up. Oh, and guess what? It's absolutely delicious! Creamy and "cheesy," even better than the boxed stuff - vegan or otherwise. Give it a try. It's perfect for this Fall weather, and I'm 99.99% certain that I will be serving it on my Thanksgiving table this year.

EASY VEGAN MACARONI AND CHEEZE
(recipe by Susan Voisin, who writes at blog.FatFreeVegan.com)
"Besides being low-fat, this recipe is also low in sodium, so salt-lovers may need to add salt. The tahini adds a little fat but a lot of flavor; still, leave it out if you need a completely oil-free dish.

Ingredients

  • 1 pound pasta (regular or gluten-free), cooked according to package directions
  • 1 1/4 cups water
  • 1 cup plain, fat-free soymilk (may use other non-dairy milk)
  • 3/4 cup nutritional yeast
  • 3 tablespoons cornstarch or potato starch
  • 1 tablespoon lemon juice
  • 1 teaspoon salt (or more to taste)
  • 1/2 teaspoon garlic powder
  • 1 teaspoon onion powder
  • 1/2 teaspoon dry mustard
  • 1/2 teaspoon smoked paprika
  • 1/2 teaspoon turmeric
  • pinch cayenne pepper
  • 2 tablespoons tahini (optional, but lends creaminess and flavor)
  • 1 teaspoon mellow white miso (or additional salt)
  • black pepper to taste

Instructions

  1. Put the pasta on to boil, according to package directions. While it’s cooking, blend water and all remaining ingredients together in a blender. When the pasta is al dente, drain it, reserving about 1/2 cup of the cooking water, and return the pasta to pan. Add the sauce mixture and cook, stirring, until mixture boils and thickens. Add a little of the pasta water if more moistness is needed.
  2. If the sauce is not as flavorful as you’d like, add a little more mustard and onion powder.
Preparation time: 10 minute(s) | Cooking time: 25 minute(s)

Number of servings (yield): 
Makes 8 servings. Per serving: 303 Calories (kcal); 4g Total Fat; (10% calories from fat); 15g Protein; 54g Carbohydrate; 0mg Cholesterol; 316mg Sodium; 5g Fiber. Also, if you use nutritional yeast fortified with B-12, one serving provides 100% of the daily requirement of that vitamin."

November 3, 2014

Raspberry Waffle Syrup


I am forty-one years old and pre-menopausal. Is that something I shouldn't talk about online? I don't care! It's a living hell. And no amount of hormonal-type (i.e. of animal origin) food avoidance is helping. I'm as pimply as a teenager, and I have daily hot flashes that my daughter's Girl Scout troop director accurately described as "my own private summer." And, hey sue me buddy, but sometimes a pimply, middle-aged woman having a hot flash needs a got-dang waffle, and sometimes there's no syrup in the house. So, she hits the internet and finds a solution. In this case, it was homemade raspberry syrup. I'd purchased two cases of raspberries the day before because they were on sale for 99 cents a case, which is a steal! So, now we're here. This syrup is delicious. We were spooning it out of the saucepan before it was even cool. Give it a try, and enjoy!

HOMEMADE RASPBERRY SYRUP
2 cups fresh or frozen raspberries
1 3/4 cups plus 1 tablespoon water, divided
1/3 cup sugar
2 tablespoons cornstarch
  • In a medium saucepan, combine 1 3/4 cups water with sugar. 
  • Add raspberries and bring to a boil.
  • Reduce heat to medium-low. Allow mixture to simmer for half an hour, stirring occasionally.
  • Place the mixture in a fine, mesh sieve and press to release all of the liquid into a bowl or large cup. Return liquid to saucepan.
  • Whisk in cornstarch remaining tablespoon water.
  • Bring to a boil over medium heat. Cook one minute, stirring constantly.
  • Remove from heat. Allow to cool before serving.
  • Can be stored in the refrigerator up to a week in an airtight container.
  • Enjoy!

September 25, 2014

Sleepaway Camp Surprise


If you have ever seen the fabulously awful movie, Sleepaway Camp (1983), you already know the "surprise." I shall reveal said surprise after the recipe, so if you haven't seen the film and don't want the surprise ruined, don't scroll down past the recipe.

Sleepaway Camp (1983)
Sleepaway Camp is a film that defies explanation or definition. It's just terribly, terribly bad. But it's so much fun to watch (seriously, it is!) it has a cult following almost on par with the Evil Dead trilogy. The original film (along with it's equally terrible predecessors) has it's own website. And the star of the film, Felissa Rose, is a frequent guest of honor at horror conventions all over the world. A Sleepaway Camp Reunion in 2001 pulled hundreds of fans who came to get a glimpse of the cast and have their t-shirts and memorabilia autographed.

In honor of Sleepaway Camp, and just good ol' summer camp food in general, I am posting a very simple, but delicious broccoli and rice casserole that is reminiscent of camp cafeteria food, but way tastier.

The recipe comes from the cookbook, The Compassionate Cook: Or, Please Don't Eat the Animals, which I was fortunate to find on the Half Price clearance rack for two dollars. Woo hoo!


BROCCOLI AND RICE CASSEROLE
from The Compassionate Cook: Or, Please Don't Eat the Animals!

"The nutritional yeast gives this casserole a 'cheesy' quality, the broccoli gives it color, and the spices give it pizzazz."

1 10-ounce package frozen broccoli florets, or 1 bunch fresh, cut into pieces
2 cups white rice (I used long-grain brown rice)
1/2 cup (1 stick) margarine (I used Earth Balance buttery spread)
1/2 teaspoon salt
1 tablespoon soy sauce or tamari
1 1/2 teaspoons garlic powder
1 teaspoon onion powder
Pinch of turmeric
I cup of nutritional yeast flakes
Salt and pepper, to taste
Pinch of paprika
  • Steam the broccoli, about six minutes.
  • Prepare the rice according to package directions.
  • Spread the cooked rice evenly over the bottom of a 9x13" baking dish.
  • Sprinkle the broccoli over the rice and set aside.
  • Preheat the oven to 350 degrees.
  • Melt the margarine in a medium frying pan over low heat.
  • Beat in the flour with a whisk over medium heat until the mixture is smooth and bubbly, then whisk in the boiling water, salt soy sauce, garlic and onion powders, and turmeric. 
  • Cook the sauce until it thickens and bubbles, then whip in the yeast. 
  • Add salt and pepper to taste.
  • Pour the sauce over the broccoli and rice, sprinkle the top with paprika, and bake for 15 minutes. 
  • If desired place pan under broiler for a few minutes until the sauce is browned and crusty.


Okay, are you ready for the surprise?

Are you sure you're ready?!

Don't scroll down if you haven't seen the movie and don't want to ruin the ending!

That's your warning!

SPOILER ALERT!!!!!

Here it comes...

Surprise! It's a weenie!
(A vegan one, of course.)


In the final scene of Sleepaway Camp, a twist is revealed. Angela, our heroine, has killed a boy and is crouched over the body. When she is approached by two camp counselers, she stands up, stark naked, to reveal that she has a dong, is a boy, and has been a boy from the get-go. She is also, naturally, the murderer. It's nonsensical gender-bending horror hi jinx like only the 80s can produce!

And, as a very special treat to my readers, I give you this...


September 18, 2014

Earth Balance Review


I'm going to take a quick detour from my Vegan MoFo theme and do a review of this amazing Earth Balance stuff that I won - yes, WON! - from VeganMoFo.com. So, I'm just putting it out there that I wasn't given this stuff specifically to review, and nobody asked me to review it. I am reviewing it because I thought it would be a nice thing to do since I won it. Did I mention that I won it?! Seriously, though, I only won it because MoFo is a time of magic, when unicorns whinny outside my kitchen window and pixies poop jellybeans into my morning coffee.
I love you, MoFo! Thanks for the giveaway and the awesome prize! And, mucho thanks to Earth Balance for supplying and shipping it - oh, and for inventing it too! I bet I eat my weight every year in organic Earth Balance butter, a substance for which I will always be grateful to you. Love the stuff.

This is my prize. ALL of this! Mine! ALL MINE!!!
Fra-geeeee-laaaaaay.

That top picture,yeah that one with all the goodies, is what came in a rather beat up box to my modest home in Fort Worth, TX, on a hot summer day earlier this week. I was tired from work and grouchy from the heat. Cracking open a homely and unassuming box to find pure treasure inside was such a delight!

Now, on to the reviews...

 Earth Balance Creamy Peanut Butter

It's creamy, sweet (but not too sweet), and easy to spread on toast. What more can I say? Oh yeah, it doesn't separate. You don't have to spend two hours digging into the dry gulch at the bottom of the jug, knocking oil out all over your countertop, trying to get the nuts and the oil to kiss and make up. It's easy-peasy to work with and it's delicious.
Earth Balance Vegan Cheddar Squares

Oh my goodness, these are so yummy! They are light and buttery. The "cheese" flavor doesn't come through very strongly on the first bite - it's more of an aftertaste. But I didn't mind. These were really tasty. I had to stop myself from gorging on them. And today, when I got home from work, I was really looking forward to having another handful only to find that my husband and daughter had eaten the whole box! Grrrrrrr.


Earth Balance Vegan Cheddar Kettle Chips

I'm gonna be honest. This was my least favorite offering from the box of goodies. The chips themselves are cooked perfectly - flaky and crunchy, and kind of oily, exactly like a good kettle chip should be. But the "cheddar" flavor is a bit off-putting. It's very strong, and it's not at all like traditional cheese. It has that weird whang of Daiya cheddar in it. If you've ever eaten Daiya you probably know what I mean. It's good, but it doesn't taste a thing like cheese. And it leaves an oily aftertaste in your mouth. To the chips' credit, though, I liked them enough to down the whole bag at work today. I let some of my coworkers try them too, to mixed reviews. I think this is a 'like it' or 'hate it' kind of treat. Some liked it, others hated it. My husband was one of the haters, but he also hates Daiya. I don't mind Daiya so much, if it's used on the right dishes. And I didn't mind these so much either, but I don't think I will buy more unless they are on deep clearance.


Earth Balance Vegan Cheddar Mac and Cheese

It is absolutely amazing how much this looks like standard Kraft mac and cheese. It's a dead ringer! The flavor is nice, but it isn't going to fool anyone. It's amazing to behold, though - it's the closest I've ever seen to the boxed mac and cheese in vegan form. Like the kettle chips, it has a little whang of that Daiya-type aftertaste, and a slight acidity that I'm unaccustomed to in mac and cheese. But, if you don't go into it expecting it to taste exactly like the mac and cheese of your youth, and just go with it for what it is, you will be pleasantly surprised. My six-year-old daughter, who is a very picky eater, ate 2/3 of the bowl you see in the photo, so that right there is a vote of confidence. I think we will be buying this again, depending on the price. Take my advice and sprinkle a little nooch and freshly-ground black pepper on the top. It cuts the tiny sting of acidity you get (it's almost like a slight vinegar taste) and makes this totally snarf-able. My only complaint is that one box doesn't make very much. That bowl you see in the photo is the entire box! The bowl I used is just a standard-sized rimmed soup bowl that will comfortably hold one regular can of soup. The nutrition label purports to contain two and a half servings, but unless you are feeding tiny gnomes, you're hardly going to get two and a half servings out of it. 


Earth Balance Vegan White Cheddar Mac and Cheese

This box of mac and cheese was a vast improvement over the orange cheddar one. The flavor was much more smooth, less acidic. I really liked it and so did my daughter. This is the flavor we will likely be buying on a regular basis. The nooch and black pepper on top (not pictured) is good on this as well, but not 100% necessary. It tastes good all by itself. Thumbs up! Again, though, it didn't make very much. It's really just one serving unless you're eating it alongside other foods. But who the heck does that?? When I make mac and cheese it's because I'm too lazy to really cook, and the mac and cheese is all I eat. This happens more often than I care to admit... *sigh*

Altogether, my family and I thoroughly enjoyed this sample box of goodies and I'm so grateful I had the opportunity to try all of this wonderful stuff! 

P.S. Earth Balance, I have one request - please offer the white cheddar mac and cheese in a gluten free option and I will be your best customer. Seriously, I will eat it every day! Thanks!

September 16, 2014

Christine's Premium Motor Oil


Christine's Premium Motor Oil tastes oddly like chocolate syrup...

There are those perfect vegans in the world whose taste buds are so pure, unadulterated and refined that they claim to never crave any unhealthy foods. They might say, for instance, "I used to Jones for ice cream 24/7, but now all I ever want is kale." To this I say both Piff and Twaddle. C'mon, guys. Are you seriously telling me that you never crave slumber party food? Like, never?! 


Well, the opposite of that is me - I am a junk food enthusiast who could live on homemade popcorn drenched in vegan butter and nooch, and who loves to bake bake bake! Yes, I do try to control my intake of junk food, and I eat my fair share of kale, but I would be straight-up lying if I said I never had a sharp craving for the rich stuff - sugary, chocolaty, richy rich, ooey gooey, yummy stuff. Yeah, you know what I'm talkin' about!

Luckily, thanks to the absolute necessity of learning to cook if you want to be a healthy vegan, I can make my own versions of just about anything I'm craving. That's where this li'l awesome recipe comes in.

My six-year-old daughter, Lila, wanted ice cream with chocolate syrup. (She has two boxes of Ruby's Rockets in the freezer, but - no! - it had to be ice cream.) We all know the frozen banana ice cream trick (if you don't know it, scroll down to the bottom of this post), and it always suffices. She loves the stuff. But what about the syrup? I could probably find something that's technically vegan at the grocery store, but I don't want my little toot gobbling up gallons of HFCS and artificial dyes. What to do? Keep reading and you'll find out...

Christine (1983)

Anybody remember the movie Christine? The book was by the great Stephen King, the movie by the equally great John Carpenter. If you've never seen it, it's honestly really good. And, like so few horror films from the 80s, it stands the test of time. If you have cable TV (I, myself, do not *sigh*) I'm sure you'll be able to catch it in October when AMC starts running horror films all month. I highly recommend that you DVR it. Also, the title character, Christine, is a car. Thus, the motor oil association.

And now, let's get to the chocolate syrup recipe... Nom nom nom.

Christine's Premium Motor Oil

1 cup non-dairy milk (I used almond milk)
1 cup sugar, or more to taste
1/2 cup unsweetened cocoa powder, sifted if lumpy
1/4 teaspoon salt
1 teaspoon vanilla
A few drops/squirts liquid stevia (optional)
  • Bring the milk to a gentle boil in a small saucepan, stirring frequently with a whisk. 
  • Add the sugar and whisk to dissolve.
  • Add the cocoa and salt. Whisk to mix. Reduce heat to medium-low. 
  • Let mixture simmer for a few minutes, stirring or whisking occasionally, until it starts to thicken a bit. It will thicken more as it cools.
  • Remove from heat and whisk in the vanilla.
  • Grab a spoon and try some. If it's not sweet enough, you can stir in a few drops of liquid stevia to pump it up.
  • Allow to cool before pouring on ice cream or stirring into milk. This stuff makes a fantastic glass of chocolate milk!!
  • Store in the refrigerator in an air-tight container.
Oh yeah, buddy! Banana ice cream with homemade chocolate syrup.
Life is gooooooooooood.

Side Note: We have begun homeschooling our daughter and this recipe was a fantastic cooking lesson for a six-year-old. It didn't have a lot of ingredients, but it did involve actual stove top cooking and mixing. She loved it!

Banana Ice Cream
If you've never made the banana ice cream, you must try it! It's so wonderful, and so insanely easy, you will never look back. Peel some bananas, break them up into two or three pieces and freeze them. When you're ready to make the ice cream, just toss the frozen bananas into a food processor and whirl until smooth - no sugar needed. My kid eats it right out of the processor tub and this is the reaction I get every time.

 A smile worth every dollop of ice cream dropped on the kitchen floor.

September 10, 2014

Evil Dead Delights


I work in a church and the sales rep from a giant corporate Christian book supply company just happened to stop in a few days ago to check in and see if we needed to order anything or whatever. He's a really nice guy, but I don't know him very well. I've only met him one other time in the year that I've worked there. Being a hospitable Southern gal, I offered him a muffin (vegan banana chocolate chip) and this sparked a nice conversation about vegan food and my blog and, of course, my MoFo theme. And then, get this, he says, "I have an idea for you. Evil Dead Delights." 

You have to picture it. This is a corporate Christian book supply guy in a button down shirt with a name tag on, not at all someone you'd expect to know what the heck The Evil Dead is. That's what I get for judging the book by it's cover, V'egg in my face! And I, of all people, should know better because nobody would ever look at me, in my dorky mom clothes, and think I love sci-fi and 80s horror films. 

So, this one's for you, really nice corporate Christian book supply guy in a button down shirt with a name tag on! I applaud your taste in 80s horror films. 

The Evil Dead (1981)

If you are unfamiliar with The Evil Dead trilogy, allow me to introduce you to it. It is the creation of Sam Raimi, whom you may know from the likes of Xena, Warrior Princess; SpiderMan; and Drag Me to Hell. The brilliant thing about The Evil Dead trilogy is that it starts off in all seriousness, with the first film being gory, gross and really spooky. Then the second film, The Evil Dead 2, starts to get a bit comical toward the middle - ridiculous amounts of blood, Ash's hand turning against him (this is where he gets his famous chainsaw arm), among other silly things. The third film in the trilogy, Army of Darkness, just goes balls out with zaniness. Ash is a total bad ass and he says tons of hilarious stuff. You can find literally thousands of Ash and Army of Darkness t-shirts, posters, toys, action figures, comics and so much more. It's a cult sensation. And it's totally delightful, just like these Evil Dead Delights.

Army of Darkness has a fabulous tagline:
"Trapped in time. Surrounded by evil. Low on gas."

I have a confession to make. I am one of those degenerate regulars you see in the clearance section of Half Price Books. You know, that shadowed section full of weirdos way back in the butt end of the store, right next to the bathrooms. Yeah, that's the one! Well, you may not know it but there's a cookbook section back there. And it rocks! My most recent score was a clean hardback copy of Skinny Bitch Bakery. Guess how much I paid for it. Go ahead, guess! Two bucks, my friend. It even has the dust jacket on it. Yeah, it's missing a few pages in the middle, but that ain't no thang. I can cook around that.

How can your mouth not water just looking at these things?!
And, yeah, they taste every bit as good as they look.

So, here's the recipe I chose to represent my Evil Dead Delights - Kim Barnouin's "Sanctuary Tracks Cookie Bars" from the Skinny Bitch Bakery cookbook. My personal baking notes are written parenthetically to the side of each ingredient. Deeeeee-licious!

1 tablespoon soy milk or creamer
1 cup mashed banana (I used one banana)
2 1/4 cups all-purpose flour (I used whole wheat)
1/2 teaspoon baking soda
1/2 teaspoon sea salt (I used regular ol' salt)
3/4 cup non-dairy margarine (I used Earth Balance)
3/4 cup evaporated cane sugar (I used organic white sugar)
3/4 cup packed brown sugar
1 cup crunchy organic peanut butter (I used creamy)
2 teaspoons vanilla extract 
1 1/2 cups vegan chocolate chips
1 cup organic raspberry jam (I used apricot preserves)

  • Preheat the oven to 350 degrees. Lightly grease a 13x9" pan and set aside. In a small bowl, combine the soy milk and mashed banana and mix well. In a large bowl, sift together the flour, baking soda, and salt. In a separate bowl, cream the margarine, sugars, and peanut butter; then add the vanilla extract and banana mixture.
  • Slowly add the dry ingredients to the liquid mixture until combined. Stir in the chocolate chips until well combined. Evenly spread half of the dough in the pan. Spread the raspberry jam on top of the dough, and add the remaining dough mixture; smooth with a rubber spatula.
  • Bake the cookie bars for 20 to 25 minutes, or until they are golden on top. Let the cookie bars cool completely before cutting them into squares.