Showing posts with label quick and easy. Show all posts

April 3, 2017

Quick and Easy Tropical Sorbet


The story behind this homemade sorbet is fresh in my memory because:
a) it's short, and
b) it literally just happened twenty minutes ago.

My daughter was coming into the house, after playing outside for a while, and she banged her top lip on the metal door, giving it a little scrape and making it swell up. So, I told her I'd make her something cold to help the swelling go down. I thought I would whip up a smoothie real quick, but my blender was in the dishwasher getting hosed down. However, my food processor was clean and available! So, I swirled together a bunch of stuff that I found in my freezer and fridge and made a sorbet, not certain how it was going to turn out. But you know what? IT WAS DELICIOUS! I thought I'd hop onto the blog and share it with you guys before I forgot what I put in it - it's perfect for a cooling spring and summer pick-me-up. I put the leftover sorbet in popsicle molds. Can't wait to try those too!

This makes a lot, so halve the amounts if you don't want more sorbet than two to four people can eat in one sitting. Also, I'm just kind of memory-eyeballing the amounts here. I did not measure this. I just tossed stuff into the food processor and hoped for the best. It's just how I like to live my life.

1 cup frozen pineapple chunks
1 cup frozen peach slices
1 cup frozen nectarine slices
1 cup frozen strawberries
1 cup frozen mango chunks
1 cup ruby red grapefruit juice
3 tablespoons agave or maple syrup, or more to taste
1/2 - 1 cup non-dairy milk, to taste

  • Put everything except the milk into a large (I think mine is a 4-quart) food processor and start spinning on high. Gradually drizzle in the milk, just a few tablespoons at a time, to thin out the mixture to your desired consistency. 
  • Serve it up and enjoy!

October 3, 2016

Banana Walnut (or Choc Chip) Muffins


I'm sorry I haven't posted in a while, but I've started homeschooling my kiddo  and that is keeping me very busy! Gone are the days of solitude where I can clean house for a while and then cook and blog while the washer is running. But, that's okay, I love homeschooling and so does my daughter! But I'll still post when I can. In the meantime, I picked up a new-to-me cookbook called The 30-Day Vegan Challenge by Colleen Patrick-Goudreau (whose podcast, Joyful Vegan, is fantastic!) and I'm so excited about it that I wanted to share the first recipe I made from the book.

My daughter is 8-years-old and is obstinate about vegan food. Sorry, "vegangelicals," but she is very adamant that she does not want to eat vegan food and while I frequently encourage her to try it, I do not force her to eat only vegan. But, I am a sneaky redhead, so here's what I've been doing - I've been making vegan recipes and not telling her they're vegan and keeping tabs on the ones she really likes. So far, I've only been able to trick her with my three-bean chili. I use the Trader Joe's vegan ground beef substitute and she honestly hasn't noticed that it's not beef. Now, the reason I'm so excited about Ms. Patrick-Goudreau's cookbook is because it has lots of yummy-looking "kid food" in it, like mac and cheese, chocolate cake, and quesadillas, and when I showed my daughter the photos in the book she said, "Mmmm, that looks good! Get this cookbook." I never told her it was a vegan cookbook. I'll keep you posted on how she responds to the recipes.


This is the recipe for Banana Chocolate Chip Muffins, but I didn't have any chocolate chips, so I subbed chopped walnuts instead.

2 cups whole wheat pastry flour or unbleached all-purpose flour
1 1/2 teaspoons baking soda
1/2 teaspoon salt
1 cup granulated sugar
1/3 cup canola oil
4 ripe bananas, mashed
1/4 cup water
1 teaspoon vanilla extract
1 cup semisweet chocolate chips (or chopped walnuts)
  • Preheat oven to 350 degrees.
  • In a medium-sized bowl, mix together flour, baking soda, and salt. Set aside.
  • In a large bowl or stand-mixer, beat oil and sugar together. 
  • Add mashed bananas and mix.
  • Add water and vanilla. Mix again.
  • Use a spoon to gently stir the flour mixture into the wet mixture.
  • Fold in chocolate chips or walnuts.
  • Fill each muffin tin halfway with batter. (With the use of the Reusable Silicone Baking Cup Liners, I was able to get 20 muffins out of this batch.)
  • Bake for 20 - 30 minutes, until a toothpick inserted in a center muffin comes out clean.
  • Enjoy!

October 12, 2015

Fresh No-Cook Spaghetti Sauce


In the mood for something fresh, light, easy and breezy? You have to try this amazing, no-cook spaghetti sauce! A few days ago, a friend of a friend on Facebook posted a video from Food & Wine magazine that I saved immediately because I just knew I had to try it. You just use a box grater to grate tomatoes into a bowl, add a few other ingredients, mix it with cooked pasta and you're good to go. I thought it must be too good to be true, but I tried it for dinner tonight and I'll be danged if it isn't delicious! Here's the video:


And here's my take on it:


16 ounces spaghetti noodles, cooked
6 to 8 large, ripe beefsteak tomatoes, cut in half
3 tablespoons olive oil (optional)
1/2 to 1 teaspoon salt, to taste
1/2 to 1 teaspoon garlic powder, to taste
1 teaspoon dried oregano
Handful fresh basil leaves, chopped


  • Grate the tomatoes into a large bowl with a box grater.
  • Add remaining ingredients, to taste, and stir. 
  • Toss with your spaghetti and serve.
  • Seriously, it's that freakin' easy.
  • Enjoy!


November 2, 2013

Chocolate Quinoa Pudding


It may sound weird or gross, and it may look weird or gross (my husband turned up his nose at it when he saw it sitting in the pot on the stove), but trust me and try it. It's really good! It's kind of like rice pudding or a sticky tapioca pudding, with a real kick of chocolate flavor. The same husband who wrinkled his face up at the sight of the pudding ate an entire cup of it and admitted that it was good. My daughter enjoyed it too!


I just happened to get lucky yesterday and find cheap, organic quinoa at the salvage store. $1.59 for a 12-ounce bag! Can you believe it?? Needless to say, I bought more than one bag. Now I have quinoa coming out of my wazoo, but - hey - I sure don't mind!

2 cups almond milk
1 cup quinoa, rinsed
1/4 cup sugar (optional, if you don't mind it not-so-sweet)
1/2 cup vegan semisweet chocolate chips
1 teaspoon vanilla extract
Unsweetened, shredded coconut (for garnish)

  • Heat almond milk, quinoa, and sugar in a medium saucepan until boiling, stirring often. 
  • Reduce heat and allow to simmer until quinoa is soft and much of the liquid is cooked off. 
  • Stir in chocolate chips and vanilla. Once chips are melted and well-incorporated, give the mixture one more stir then place a lid on the pot. Allow it to rest for five to ten minutes before spooning into bowls and topping with a sprinkle of coconut.
  • Enjoy!

June 4, 2013

Low-Guilt Chocolate Chip Cookies


Please take heed that I titled these cookies "low guilt," not "NO guilt." So, yes, there is a small amount of guilt involved with the consuming of these cookies, but I just love eating cookies so much, I will accept an extra dimple or two on my butt as a token of my affection for this confection.

I do still love whipping up Dreena Burton's yummy Homestyle Chocolate Chip Cookies when I can, but my pocketbook does not often allow the purchase of maple syrup. Seriously, why is that stuff so expensive?!
So, I took the liberty of altering Isa Chandra's Chocolate Chip Cookie Recipe from the Post Punk Kitchen and tried to make it just a smidge healthier, albeit not totally guilt-free.

I replaced half of the oil with unsweetened applesauce, left out the milk entirely, subbed potato starch for tapioca starch (because it's cheaper), subbed whole wheat pastry flour for the dastardly white stuff, and added in an extra quarter cup of chocolate chips (because I flippin' love chocolate).
The verdict? Slightly less evil, but just evil enough to taste amazing. The family went nutso for these, and my husband was shocked that I'd removed an entire 1/3 cup of oil. He said he couldn't tell the difference at all between these and the wonderful Isa Chandra recipe I've been making for years.
Give these a try and let me know what you think!

1/2 cup brown sugar
1/4 cup granulated sugar
1/3 cup unsweetened applesauce
1/3 cup canola oil
2 tablespoons potato starch (this sounds weird, but I promise it's cheap and easy to find)
2 teaspoons vanilla extract
1 1/2 cups whole wheat pastry flour (can sub white flour)
1/2 teaspoon baking soda
1/2 teaspoon salt
1 cup semisweet chocolate chips
  • Preheat oven to 350 degrees, and lightly oil two large cookie sheets. In lieu of oil or baking spray, a Silpat works well for these cookies if you have one.
  • Mix together the sugars, applesauce, oil, starch, and vanilla until smooth and creamy. 
  • Add flour, soda, and salt. Stir until well-incorporated and smooth, but take care not to overmix or your cookies will lose that crunchy-on-the-outside-soft-on-the-inside magic that makes them so good.
  • Fold in the chocolate chips.
  • Use a Small Cookie Scoop to scoop out your dough. Place 16 dough balls on each cookie sheet, and bake for 9 minutes. Watch the cookies closely during that last minute, to make sure they aren't getting too overdone.
  • They will be puffy when you pull them out of the oven, but as they cool, they will flatten and crisp to perfection.
  • Enjoy!
CLICK/SHOP/SUPPORT

June 2, 2013

I Can Finally Eat Basil. Life is Good.

Look at those lovely, waxy leaves. They smell and taste as good as they look!
I have been waiting patiently for weeks and weeks to eat the fresh basil I planted in my garden. The crazy-deliciousness of fresh basil is just beyond compare. I've been regularly sniffing the leaves (I admit, I am a chronic leaf sniffer), my mouth watering, just hankerin' for the time I could snip off a few and put them on something - anything - edible, to throw it's flavor profile right out of the ballpark. Normally, my thoughts might hint toward spaghetti or whatever is saucy and of the Italian variety. But it's already blistering hot here in North Texas, so I'm trying to use the oven as little as possible.


Instead, I found some gorgeous tomatoes at Aldi, for super cheap. Big flavorful fatties in a four-pack, for a buck and some change. So, I sliced them up, spritzed them with a generous helping of balsamic vinegar, put a fresh basil leaf on each one, then topped them with a slice of cucumber and some black pepper. They were AMAZING! Light and full of the fresh flavors of summer. I am planning to serve these at every dinner party I throw from now until the end of time. Give it a try!

P.S. If you're not already growing your own basil, it's not too late!
Here's a great website with all the info you need to get growing.
http://www.growing-basil.org/

CLICK/SHOP/SUPPORT

May 19, 2013

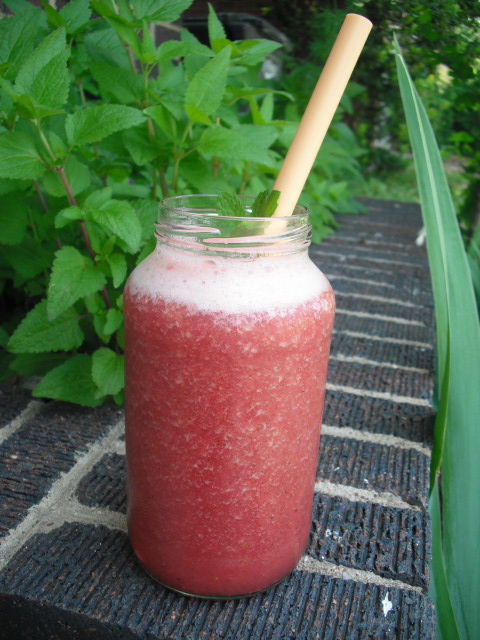
Watermelon-Berry Summer Sipper


It's not even June yet, and we're already climbing up into the 90s here in the Lone Star State. We've gotten out the blow-up pool, strung up the hammock, and started hoarding ice cubes in preparation for another long, hot Texas summer.

Here in Texas, we like to say...

"It's hotter than a billy goat in a pepper patch!"
"It's so hot the hens are layin' hard-boiled eggs!"
"It's so hot I used my seatbelt buckle as a brandin' iron!"
"It's hotter than a preacher's knee!"
"It's hotter than whoopie in woolens!"
"It's hotter than a burnin' stump!"

This explains why I'm inside my nice, cool house sippin' on my Watermelon-Strawberry Summer Sipper while the husband and kid splash in the pool. Don't judge me - I took some Sippers out to them too. But I'm stayin' right where I'm at, watching the flowers grow through my window panes, while the ceiling fan laps my bangs. Ahhhhhhhhh, summer in Texas...

Flesh of half a baby, seedless watermelon (volleyball-sized)
Half a peeled cucumber
8 to 10 large strawberries
8 to 12 large fresh mint leaves (you should grow this - it's so easy!)
Between 0 (if you're good) and 3 (if you have a kid) Tbsp sugar
About 8 to 10 ice cubes

  • Put all of the fresh stuff into your blender, then just top it off with as many ice cubes as you can fit.  
  • Whirl away!
  • Enjoy.

YUMMMMMMMMM...

CLICK/SHOP/SUPPORT

April 17, 2013

"AwesomeSauce" Even Omnis Will Love


My favorite vegan restaurant, Spiral Diner Fort Worth, makes an amazing nacho dish with what seems to be the latest sensation, a vegan "cheesy" sauce made from cashews. I love these nachos super hard. They are mouthwatering and fantastic. I even eat the jalapeno slices on top, because there's the microscopic possibility that they might be ever-so-slightly impregnated with the sauce. The only problem is that, despite their fantastic food and friendly waitstaff, Spiral Diner has one slight imperfection... It's expensive! And I'm eternally broke! To be fair, they do charge a decent price considering that the bulk of their foodstuff is organic. And, if I could afford it, I would not feel ripped off eating there every single day. Hell, every single MEAL if I could! But, sadly, my trips to Spiral happen only a handful of times per year. And I am forever trying to copy their recipes so that I can make their delicious yums at home for a fraction of the price. They do teach cooking classes on occasion, but I can't afford those either. What's a poor vegan to do??

Today I was really, desperately craving those nachos. Like, I mean, I had to have 'em, man! And I know the  not-so-secret ingredient in Spiral's "cheesy" sauce is cashews. But, since when can a poor person afford raw cashews? Since almost-never, that's when. So, I farted around with a couple of cashew-free "cheesy" sauce recipes I found online and came up with my own delicious chip-dipping substance, sans the expensive cashews. And it is fabulous!

Even your omni friends will love it. They won't have any idea it's vegan - it's way too decadent to be rabbit food! They'll think it's some exotic, richly creamy awesomesauce. Hence the name, "awesomesauce." I hope you enjoy it as much as I did!

1/2 cup nutritional yeast
1/4 cup whole wheat pastry flour (can sub all-purpose flour)
2 tablespoons cornstarch
1 teaspoon salt
1/2 teaspoon garlic powder
1/4 teaspoon turmeric (optional)
2 cups water
1 teaspoon mustard
  • Whisk all ingredients together in a medium saucepan.
  • Bring to a slight bubble, stirring constantly, over medium heat. 
  • As soon as mixture begins to bubble, reduce heat to low and continue whisking until sauce thickens. Sauce will continue to thicken as it cools, so be careful not to overcook.
  • Turn heat off and remove saucepan from heat source. Stir a few more times and serve. 
  • Enjoy!
P.S. AwesomeSauce can be stored in an airtight container in the fridge for a few days. To reheat, just add a tablespoon or two of water and stir gently over medium-low heat until warm.

CLICK/SHOP/SUPPORT

April 4, 2013

Simple Stick-To-Your-Ribs Lasagna


I pulled this creation from thin air yesterday when I wanted a hot, hearty meal but I didn't want to do a lot of prep (i.e. chopping veggies for half an hour). I wasn't sure how it was going to taste, but it smelled amazing as it bubbled in the oven, and the entire family gobbled it down like it was chocolate lava from the Alps. It was so delicious! And, quite honestly, I couldn't tell the difference between my version and the "real deal," even though I can admit that it's been a long time since I've tasted the real deal. Anyway, this would be the perfect dish for a non-vegan dinner guest or an omni potluck.
Put this one together when you're really hungry, and want some comfort food, but don't want to work too hard for it.

INGREDIENTS
9 lasagna noodles, prepared according to package directions then "shocked" with cold water
1 pound firm tofu, drained
1 jar of your favorite spaghetti sauce
16 ounces mushrooms, sliced
1 teaspoon olive oil (optional)
1/4 cup nutritional yeast
1 teaspoon dried oregano
1 teaspoon dried basil
1 teaspoon garlic powder
1/2 teaspoon salt
1/2 teaspoon pepper

  • PREP
  •  First, you need to whip up the noodles. Easy enough. After you've drained them in the colander, just "shock" them by rinsing them off with some cold tap water until they're nice and cool. This will keep them from sticking together while you make your tofu ricotta.
  • Preheat your oven to 400 degrees.
  • Now, to make the tofu ricotta, you simply dump your drained tofu into a bowl and add the spices. Use a fork to smush the tofu and push in the spices. Just smush and stir until everything's combined. It only takes a minute or so. It should look like this - 


  • Now you'll just layer your ingredients in a casserole dish like so.
  1. little bit of sauce on the bottom
  2. 3 noodles
  3. little more sauce - paint it over the noodles with the back of a spoon
  4. a third of the ricotta
  5. a smattering of mushrooms
  6. 3 more noodles
  7. little more sauce
  8. another third of the ricotta
  9. more mushrooms
  10. last 3 noodles
  11. remaining sauce
  12. remaining ricotta
  13. remaining mushrooms
  • Put it in the oven, uncovered, for 20 to 30 minutes, until mushrooms are cooked through and sauce is bubbling.
  • Allow it to rest for about 15 minutes before cutting into it. 
  • Enjoy!

October 5, 2012

Easiest-Ever Hummus Quesadillas


My allergies are really buggin' me today, so I was looking for something quick and easy to whip up that would still qualify as healthy. Well, thanks to yesterday's Hep Halloween Hummus post, I have an abundance of yummy hummus to smear on any thing that will hold it. Today that thing was a whole wheat tortilla. I was going to stop there, but I suddenly got inspired! I sprinkled on some Daiya Cheddar, then some salsa. Then I grilled it all up on a cast-iron griddle and topped with a blob of Tofutti Sour Cream. It was fantastic! Don't you just love it when that happens?

Here's what the construction-in-progress version of my quesadilla looked like...


And here's Lila, all dolled up in her Dorothy-from-Kansas Halloween costume (she's gonna have that thing worn out before Halloween even gets here), chowing down on her quesadilla...


And, listen folks, I apologize if you get tired of seeing pictures of my kid. I just feel the need to prove to skeptical parents that children will actually eat this stuff and really enjoy it! I can't tell you how many times I've heard parents say stuff like, "My so-and-so will only eat french fries," and "I can't get so-and-so to eat a vegetable to save my life." Lila loves french fries too, but she eats plenty of other, really healthy stuff to balance the occasional intake of fries. Kids will eat vegetables, and they don't even need to be drowned in Ranch dressing. I promise! Sometimes you just have to get creative. Boy, riding this high horse really makes my butt hurt...
 
Anyway, here's how to piece that bad boy quesadilla together:

2 whole wheat tortillas (or whatever your favorite is)
3 tablespoons your favorite hummus, or more to taste
2 tablespoons your favororite salsa, or more to taste
A generous sprinkling of shredded vegan cheddar cheese
A dollop of vegan sour cream
  • Start your griddle heating up! I put mine on medium heat.
  • Smear the hummus on one tortilla.
  • Pile on cheese and salsa. You might want to use a spoon to spread the salsa around a bit.
  • Place the other tortilla on top.
  • Grill gently on a cast iron griddle or skillet. It doesn't take long, maybe just a minute on each side.
  • Cut with a pizza cutter while still on the griddle.
  • Place on a plate and top with vegan sour cream.
  • Enjoy!

January 7, 2012

A Big Fat Bowl of Comfort


Today has just been one of those crappy, ho-hum days where my sick, grumpy daughter is puking on everything in sight and the best thing on TV is Satan's School for Girls, starring Shannon Doherty (which, I'll admit, I am watching with perverse fascination). My cat's are whining. My kid is whining. Now I'm whining... I finally decided "enough is enough!" So, I set out to make some good old-fashioned comfort food. Sadly, my larder is pretty bare, but after a little digging I managed to piece together a delicious, and very nutritious, chili. And I'm happy to say that it turned out great! I'm working on my second helping as I type. Try it out - it's seriously good for what ails ya. Now it's time to go make some cupcakes and take a nap...

1 14-ounce package Ground Beef-style Gimme Lean, cubed
2 tablespoons oil
1 25-ounce can garbanzo beans, drained
1 15-ounce can kidney beans, drained and rinsed
2 kidney bean cans of water
1 28-ounce can diced tomatoes, drained
1 8-ounce can tomato sauce
1 vegetable bullion cube (no MSG)
1/4 teaspoon salt
1/2 teaspoon black pepper
1 teaspoon paprika
1/2 teaspoon chili powder
Pinch of cayenne pepper
  • In a cast-iron or non-stick skillet, heat the oil over medium, then gently brown the Gimme Lean on all sides. No need to be methodical with this, just keep tossing it all around with a spatula until all pieces are nice and brown and slightly crispy on the outside.
  • In a large pot, place all remaining ingredients. Stir well and heat to boiling. 
  • Reduce heat to medium-low. Add Gimme Lean, stir well, then cover. 
  • Allow to simmer for about 20 minutes.
  • Makes 8 servings.
NUTRITION INFO (per serving):
Calories: 244.9 / Total Fat: 5.2g (Saturated Fat: 0.8g, Polyunsaturated Fat: 1.6g, Monounsaturated Fat: 2.3g) / Cholesterol: 0mg / Sodium: 855.3 / Potassium: 250.8mg / Total Carbohydrates: 35.8g (Dietary Fiber: 10.4g, Sugar: 3.9g) / Protein: 14.4g

December 6, 2011

The Best Vegan Brownie You Will Ever Eat


Fudgy in the middle with a light layer of crust on top. Perfection! I've been tweaking and re-tweaking this recipe and I think I've found the perfect combination of ingredients to create brownie awesomeness. Oh yes, brownie awesomeness.
This recipe is for the basic brownie, but feel free to play around with it - top with walnuts, stir in some chocolate chips, or add some mint flavoring to the mix and sprinkle crushed peppermint sticks on the top to spice it up for the holidays.
And get ready! For what, you ask? For brownie awesomeness.
Yeah, you heard me.
BROWNIE. AWESOMENESS.
Make these right now. Trust me.

1/2 cup canola oil
2/3 cup water
2 cups granulated sugar
2 tablespoons flaxmeal
2 teaspoons pure vanilla extract
1 cup all purpose flour
1 cup whole wheat pastry flour (or sub another cup all-purpose flour)
1 cup unsweetened cocoa powder, sifted if lumpy.
1 teaspoon baking powder
1/2 teaspoon salt
  • Preheat oven to 350 degrees.
  • Grease and flour (or use baking spray in) a 9x13" baking pan.
  • Whisk together all dry ingredients in a medium bowl and set aside.
  • In a large, separate bowl beat together oil, water, sugar, vanilla, and flaxmeal on medium speed until very well mixed. 
  • Add dry mixture to wet. Stir or beat on low speed until just-mixed and smooth. Do not overmix, but don't undermix either. The batter will be thick but smooth.
  • Spread mixture evenly into your baking pan. 
  • Bake on middle oven rack for 25-30 minutes. Test with finger (don't burn yourself!). Top should be crusty, but innards should still have a little bit of "give."
  • Makes about 15 medium-sized brownies.
  • Enjoy!
NUTRITION INFO (per brownie):
Calories: 271.7 / Total Fat: 8.6g (Saturated Fat: 1g, Polyunsaturated Fat: 2.2g, Monounsaturated Fat: 4.5g) / Cholesterol: 0mg / Sodium: 111.3mg / Potassium: 99.5mg / Total Carbohydrates: 48.3g (Dietary Fiber: 4.6, Sugar: 26.8g) / Protein: 3.7g

Vegan Cookies Invade Your Cookie Jar
The 100 Best Vegan Baking Recipes
Flying Apron's Gluten-Free and Vegan Baking Classics