Showing posts with label party food. Show all posts

April 3, 2017

Quick and Easy Tropical Sorbet


The story behind this homemade sorbet is fresh in my memory because:
a) it's short, and
b) it literally just happened twenty minutes ago.

My daughter was coming into the house, after playing outside for a while, and she banged her top lip on the metal door, giving it a little scrape and making it swell up. So, I told her I'd make her something cold to help the swelling go down. I thought I would whip up a smoothie real quick, but my blender was in the dishwasher getting hosed down. However, my food processor was clean and available! So, I swirled together a bunch of stuff that I found in my freezer and fridge and made a sorbet, not certain how it was going to turn out. But you know what? IT WAS DELICIOUS! I thought I'd hop onto the blog and share it with you guys before I forgot what I put in it - it's perfect for a cooling spring and summer pick-me-up. I put the leftover sorbet in popsicle molds. Can't wait to try those too!

This makes a lot, so halve the amounts if you don't want more sorbet than two to four people can eat in one sitting. Also, I'm just kind of memory-eyeballing the amounts here. I did not measure this. I just tossed stuff into the food processor and hoped for the best. It's just how I like to live my life.

1 cup frozen pineapple chunks
1 cup frozen peach slices
1 cup frozen nectarine slices
1 cup frozen strawberries
1 cup frozen mango chunks
1 cup ruby red grapefruit juice
3 tablespoons agave or maple syrup, or more to taste
1/2 - 1 cup non-dairy milk, to taste

  • Put everything except the milk into a large (I think mine is a 4-quart) food processor and start spinning on high. Gradually drizzle in the milk, just a few tablespoons at a time, to thin out the mixture to your desired consistency. 
  • Serve it up and enjoy!

March 28, 2017

Red Lentil and Quinoa Slow-Cooker Chili


Heya! It's a been long time, sorry about that. I've been homeschooling my eight-year-old and it takes up a LOT of time. But I'm going to [try real hard to] get better about scheduling blogging time for myself so I can get back into the game. I also haven't been blogging much because I haven't really had the time to get into the kitchen and create new recipes. I've mostly just been cooking out of cookbooks and/or buying ready-made food, which is never as good as fresh, but sometimes your allergies are really awful and you're too tired to pan-fry some friggin' tofu or whatever. But the other day I had a little burst of energy and some ingredients on hand to make this chili from lentils and quinoa and, man it turned out great! So, I definitely wanted to share it with you. Give it a try - it's so easy, it makes a ton, and it's super healthy. Read on for details!

1 yellow onion, diced (save half to use as garnish, if you like)
4 cloves garlic, minced
1 red bell pepper, diced with seeds removed
1/2 cup quinoa, rinsed and drained but uncooked
1 cup split red lentils, uncooked
1 15-ounce can kidney beans, rinsed and drained
1 28-ounce can crushed plum tomatoes
1 package of vegetarian "meat" crumbles (optional, but adds nice texture)
2-4 cups vegetable stock, depending on the consistency you prefer
3 tablespoons tomato paste
.5 to 1 tsp salt, to taste
.5 teaspoon cumin
.5 teaspoon smoked paprika
1 bay leaf (optional but calms the farts, or so they say)
handful cilantro, chopped (optional, for garnish)
hot sauce (optional, for garnish)

  • It really could not be simpler. Just toss all of the prepped ingredients into your slow cooker, cook on high for about 4 to 6 hours (or more, if needed). Give it a stir maybe once an hour or so, if you're home to do that. If not, don't sweat it.
  • Ladle into serving bowls and top with onion, cilantro and hot sauce. I think some fresh avocado would be nice on this too, but I didn't have any. Boo.
  • Enjoy!
Before I go, I want to share some photos with you of my most recent trip to our town's most popular (okay, only) vegan restaurant, Spiral Diner. It's been a while since I've visited, because it's kind of 'spensive, but it was every bit as good as it was when I started going there the first year they opened, which feels like about a million years ago. Check out this grub, y'all.

Nachos Supremo

Hot Potato Grilled Cheese Sandwich
It was basically a smushed baked potato with all the trimmings grilled into a sandwich, and it was amazing!!

S'ketti and Meatballs with Garlic Toast

I bought one of these super cute mugs too!
Is it just my imagination or is that tiny triangle a derivative of the TriForce?
(Only fellow nerds will know what I'm talking about.)

July 2, 2016

Vegan 'Puppy Chow'


Super easy to make, cheap, and delicious. Plus, it makes a ton! You can't go wrong with this stuff. It's a finger food, it's a kid food, it's an ice cream topping, it's a popcorn add-in, it's a pretzel mate, it's everything you dream of and more. There's no baking involved so feel free to let your kiddos get in on the preparation.

Here's what you'll need:

1 cup vegan semi-sweet chocolate chips
1/2 cup nut or seed butter of choice (I used sunflower seed butter)
1/4 cup vegan butter
1 12.8-ounce box of rice chex or crispix-style cereal
1 cup powdered sugar
  • In a double boiler, or in a metal or ceramic bowl placed over an inch or so of water, melt the chocolate chips, nut or seed butter, and vegan butter. Stir gently until smooth and well-mixed. 
  • Pour over cereal and gently stir, folding chocolate into the cereal, coating each piece. If you have a large Tupperware container with a tight-fitting lid, you can gently shake the mixture until everything is evenly coated. 
  • Once the chocolate has cooled slightly, go ahead and toss in the powdered sugar. Gently stir or shake again.
  • That's all there is to it. Enjoy!
P.S. We're experimenting with a hybrid of the gluten-free and Feingold diets to try to curb my daughter's ADHD symptoms before school starts back up. So, you'll be seeing lots and lots of gluten-free and low-salicylate recipes over the summer. If it works, you'll be seeing them indefinitely! Wish us luck. 

January 27, 2016

Triple Protein Power Wrap


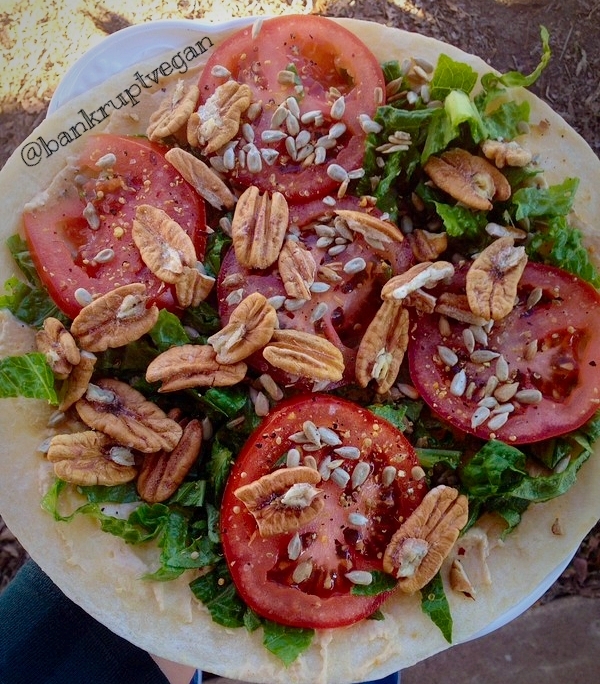
Feeling peckish, friend? Try this triple protein wrap and you will perk right up! It couldn't be easier. Just get the following stuff together and wrap it up into a little burrito of awesomeness.

Large tortilla, warmed on the stovetop
Your favorite hummus
Several medium tomato slices
A handful of lettuce
A handful of sunflower seeds
A handful of your favorite nuts (I used pecans)
Your favorite salt, pepper, herbs and spices*


*I used the Everyday Seasoning from Trader Joe's. It's so yummy! (And cheap.) If you don't have a Trader Joe's in your neighborhood, you can put together something similar on your own. The Everyday Seasoning contains sea salt, mustard seeds, black peppercorns, coriander, onion, garlic, paprika and chili pepper.

Sweep the hummus on your tortilla, then top the whole thing like a pizza. It should look something like this. 


Then carefully, and as tightly as you can, roll it up into a lovely wrap. Cut in half and enjoy! Taste great with a kombucha or an iced tea!

January 16, 2016

Vegan Nacho Cheese Sauce


Oh my Lord, people. My life just got seriously better because I tasted this cheese sauce. It is AMAZING! And, guess what, it's two main ingredients are carrots and potatoes. Seriously!

How do carrots and potatoes come together to chemically formulate what is easily the best-tasting vegan cheese sauce I've ever stuffed into my face? Is it magic? Some kind of medieval sorcery? I don't know, but I am so grateful!

2 cups peeled, cubed, boiled, drained potatoes (about 2-2 1/2 medium potatoes)
1 cup peeled, chopped, boiled, drained carrots (about 3 medium carrots)
1/2 cup nutritional yeast flakes
1/3 cup canola or extra virgin olive oil*
1/3 cup water or vegetable broth
1 tablespoon lemon juice
1 teaspoon salt, or more to taste
1/2 teaspoon turmeric, or more to taste
1/2 teaspoon chili powder, or more to taste
Unsweetened non-dairy milk of choice, to taste
  • Place all ingredients into a high-powered blender** and blend. It's just that simple! Put your drained carrots and potatoes into the blender right after you drain them, while they're still piping hot, so your cheese will be piping hot too.
  • As you're blending, drizzle in some milk to help thin it out a bit, if you want to. 
  • Can be stored in the fridge, in an airtight container (I'm not sure how long because we always eat it up pretty quickly), for a few days, perhaps? 
  • *I'm working on figuring out a way to reduce the oil in this recipe. It's way too much, I know. I'll keep fiddling with it and get back to you.
  • **If you don't have a high-powered blender (I sure don't), you might want to liquify in a food processor first, then transfer to a blender and drizzle in the milk while blending, to keep your little $20 blender from overheating.
  • Enjoy!

October 11, 2015

Portobello Sloppy Joe's

Hey friends! It's been a long time since I posted on this blog, but that's all about to change. If you followed my summer adventures on the blog, The Thinking Spoon, you will know that I had surgery to remove a rare and fast-growing 4.5x5cm tumor from my left breast. The surgery wasn't too bad at all, but I suffered severe bronchitis and a disgusting staph infection on my leg afterward. So, it's not been the greatest summer. I'm still weak and I've put on a lot of weight from all my time spent convalescing, but I'm finally starting to perk up. And I'm ready to reclaim my health! The recipes that I will feature from here on out will focus on maximizing nutritional benefits. I need to lose weight, get strong, and make darn sure I don't wind up with another cancer scare. I hope you'll come along with me and offer your support and suggestions along the way. I love hearing from you guys! So, let's get started with a new recipe in a new year from a new gonna-get-healthy Jen. 


In the South we like our Sloppy Joe's kind of sweet, with a maple-y BBQ flavor. If you prefer them more on the savory side, leave out the sugar and ketchup, and just add an extra tablespoon or so of tomato paste, along with some savory spices of your choosing. You can't mess this one up. Just taste as you go and you'll end up with something fun, yummy, and really, really messy on your plate, which is why they have the word "sloppy" right there in the title.
I topped mine with homemade pico de gallo, but I think pickled jalapenos or just straight-up lettuce and tomato would be nice too. My husband likes to spritz his with classic hot sauce and my daughter likes to eat hers on tortilla chips. You seriously can't go wrong. I hope you enjoy these!
<1 pound portobello mushroom caps, coarsely chopped 1 tablespoon extra virgin olive oil 1 large sweet onion, small dice 1 large red bell pepper, small dice 3/4 cup + 2 tablespoons cheap beer, divided
1/3 cup walnuts, finely chopped (optional, depending on your budget)
4 tablespoons tomato paste
1/4 cup ketchup
1 teaspoon sugar
A few drops of liquid smoke
Salt and pepper, to taste
6 hamburger buns
Toppings of your choice (homemade pico de gallo is pictured)

  • Whirl the mushrooms in batches in a food processor until very finely chopped, scraping the sides as needed to incorporate larger chunks. Don't pulse them so long that they liquify.
  • Drizzle oil into a hot cast iron skillet. Add the onions and cook until soft. Add 1 tablespoon of the beer and continue to cook for a few minutes more.
  • Add walnuts and red bell pepper to the pan, along with an additional tablespoon of beer, and cook until the pepper pieces are tender.
  • Add the mushrooms and cook until soft and well-incorporated.
  • Add all remaining ingredients, except buns and toppings (d'uh). Simmer uncovered, stirring occasionally, until the mixture reaches a taste and consistency that you like. Feel free to fiddle with the flavors, add some other spices, or jazz it up any way you like it. 
  • When you get it where you want it, turn off the heat and allow the mixture to rest a few minutes. It will thicken a bit as it rests.
  • Spoon onto toasted buns and top with your favorite stuff. 
  • Enjoy!

December 11, 2014

Alicia Simpson's Sweetgrass Snickerdoodles

Naughty li'l elves!
I have yet to try an Alicia Simpson recipe that doesn't taste amazing! This snickerdoodle cookie recipe is no exception. Crispy, cinnamon-y and full of seasonal oomph, I'm planning to give little stacks of these beauties as Christmas gifts. They go great with coffee or chai tea. And, as you can see in the photo, Santa's Scout Elves just love them! My daughter has two scout elves because Santa determined that she needed an extra set of eyes on her during the holidays - she's a chronic gift-jiggler. She named her elves Lula and Layla, which makes me curious about the names of my future grandchildren...


Alicia Simpson's Sweetgrass Snickerdoodles
from Quick and Easy Vegan Comfort Food (affiliate link)

1/2 cup nonhydrogenated margarine
1/2 cup shortening
1/2 cup unsweetened applesauce
1 cup granulated sugar
1/2 cup light brown sugar
2 3/4 cups unbleached all-purpose flour
1 1/2 teaspoons cream of tartar
1 teaspoon baking soda
1 teaspoon baking powder
1 teaspoon salt
Garnish:
1/4 cup sugar
1 tablespoon ground cinnamon
  • Preheat the oven to 350 degrees.
  • Cream the margarine and shortening with the applesauce and sugars. In a separate bowl combine the flour, cream of tartar, baking soda, baking powder, and salt. 
  • Combine the dry ingredients with the creamed mixture 1/2 cup at a time and mix with an electric mixer until all of the dry ingredients are incorporated.
  • Chill the dough for about 10 minutes in the refrigerator. 
  • Combine 1/4 cup granulated sugar with the cinnamon. 
  • Scoop 1-inch balls of dough with a teaspoon. Roll each ball in the cinnamon sugar mixture, coating all sides. 
  • Place on a baking sheet about 1 1/2 inches apart and bake for 12 minutes for chewy cookies and up to 15 minutes for a crisper cookie.
  • Remove from baking sheet, cool, and enjoy.
Please Note: Alicia Simpson did not put me up to this. I purchased the cookbook on my own, years ago, and I love it! If you want to support a fantastic vegan cookbook author, buy something with her name on it. You won't be sorry! I've included all of her Amazon.com cookbook listings below. If you click and buy one (or all!) of these books through my links, I'll get a small percentage of the purchase price, which really helps me out. Thanks!

December 9, 2014

Autumn's Easiest Dried Apples


I know I'm a little late with this post. I actually made these dried apples and took this picture well over a month ago, but it's been busy around here. I vow, right now, to get back to posting more regularly! Now that I am jobless I seriously have no excuse. But I'm one of those moderately crazy OCD people who think they can accomplish nothing creative until their house is clean. So, I end up cleaning constantly, and never writing or exercising or anything else useful until my house is clean, which it never is, so you get my drift... My new year's resolution is going to be to let the house be messy and get my creative stuff done first! As I type, there are muddy dog prints on the carpet in the back room and a pile of dishes in the kitchen sink. I can't let those things haunt me. Let's get to the apples!

For this recipe you will need a dehydrator, and it does not have to be a fancy one. The dehydrator I used cost $20 (I got it at Aldi last summer) and it works great! And you don't have to have an apple peeler/corer combo, but it saves you an hour or more of peeling and chopping and helps to make sure all of your apples are the same thickness. I'm talking about one of these things...
(Affiliate link- Click the photo to be taken to the product.)


I recommend a stout, cast-iron body corer with a clamp (like in the picture) as opposed to a suction cup. Again, these run about $20.

Use a nice sweet, or tart, apple. I like to use Pink Lady apples. A Red Delicious, for example, might not make for a very flavorful chip. But a Jazz or Granny Smith would make a yummy chip for sure!

So basically, you just twirl your apple through this contraption and it takes the skin off (drying the skin makes it too chewy - trust me and take it off), cores the apple and spiral slices it all at the same time. What you have left is just the good "apple meat." Take a knife and slice it just once from top to bottom, which will leave you with a lovely stack of evenly sliced apple chips. Lay each chip in a single layer in your dehydrator. The sides can be touching, but it is very important that the apples not overlap one another.

If you're wondering about browning, don't worry. The first time I tried this, I was very concerned about whether or not I needed to dip my apples into a lemon juice solution (or something similar), but I read online that it wasn't necessary and I went for it. The apples you see in the photo have not been treated, or flavored, with anything. I just popped the raw apple slices right into the dehydrator and that was it.

Once your apples are set, turn on your dehydrator (mine does not have any particular settings, just a plug that turns it on and off) and let those babies crisp up over a twenty-four hour period, give or take a few hours depending on your machine. Rotate the layers every couple of hours or so. Make sure the apples are totally dry. If you take them out too soon and don't eat them right away they will spoil quickly.

Once they're done, allow them to cool at room temperature before storing them in an airtight container. Then enjoy! They are delicious and nutritious - and a perfect compliment to movie night.

November 4, 2014

Easiest, Yummiest Mac and Cheese


It's finally Autumn in North Texas, my favorite time of year! After another brutally hot summer, it's finally cool enough to open the windows and let some crispy fresh air come inside. Even better, it's pouring down sweet, much-needed rain right now. I have the house to myself. And I'm catching up on both my cleaning and my Netflix queue. It's a great day! Of course, a great day like this calls for some comfort food. I made chocolate oatmeal energy balls last night, so sweets are covered. The only thing missing is something cheesy. Enter the Easy Vegan Macaroni and Cheeze recipe from the Fat Free Vegan Kitchen. I just did a quick Google search for "the best" vegan mac and cheese and this is what popped up. Oh, and guess what? It's absolutely delicious! Creamy and "cheesy," even better than the boxed stuff - vegan or otherwise. Give it a try. It's perfect for this Fall weather, and I'm 99.99% certain that I will be serving it on my Thanksgiving table this year.

EASY VEGAN MACARONI AND CHEEZE
(recipe by Susan Voisin, who writes at blog.FatFreeVegan.com)
"Besides being low-fat, this recipe is also low in sodium, so salt-lovers may need to add salt. The tahini adds a little fat but a lot of flavor; still, leave it out if you need a completely oil-free dish.

Ingredients

  • 1 pound pasta (regular or gluten-free), cooked according to package directions
  • 1 1/4 cups water
  • 1 cup plain, fat-free soymilk (may use other non-dairy milk)
  • 3/4 cup nutritional yeast
  • 3 tablespoons cornstarch or potato starch
  • 1 tablespoon lemon juice
  • 1 teaspoon salt (or more to taste)
  • 1/2 teaspoon garlic powder
  • 1 teaspoon onion powder
  • 1/2 teaspoon dry mustard
  • 1/2 teaspoon smoked paprika
  • 1/2 teaspoon turmeric
  • pinch cayenne pepper
  • 2 tablespoons tahini (optional, but lends creaminess and flavor)
  • 1 teaspoon mellow white miso (or additional salt)
  • black pepper to taste

Instructions

  1. Put the pasta on to boil, according to package directions. While it’s cooking, blend water and all remaining ingredients together in a blender. When the pasta is al dente, drain it, reserving about 1/2 cup of the cooking water, and return the pasta to pan. Add the sauce mixture and cook, stirring, until mixture boils and thickens. Add a little of the pasta water if more moistness is needed.
  2. If the sauce is not as flavorful as you’d like, add a little more mustard and onion powder.
Preparation time: 10 minute(s) | Cooking time: 25 minute(s)

Number of servings (yield): 
Makes 8 servings. Per serving: 303 Calories (kcal); 4g Total Fat; (10% calories from fat); 15g Protein; 54g Carbohydrate; 0mg Cholesterol; 316mg Sodium; 5g Fiber. Also, if you use nutritional yeast fortified with B-12, one serving provides 100% of the daily requirement of that vitamin."

September 10, 2014

Evil Dead Delights


I work in a church and the sales rep from a giant corporate Christian book supply company just happened to stop in a few days ago to check in and see if we needed to order anything or whatever. He's a really nice guy, but I don't know him very well. I've only met him one other time in the year that I've worked there. Being a hospitable Southern gal, I offered him a muffin (vegan banana chocolate chip) and this sparked a nice conversation about vegan food and my blog and, of course, my MoFo theme. And then, get this, he says, "I have an idea for you. Evil Dead Delights." 

You have to picture it. This is a corporate Christian book supply guy in a button down shirt with a name tag on, not at all someone you'd expect to know what the heck The Evil Dead is. That's what I get for judging the book by it's cover, V'egg in my face! And I, of all people, should know better because nobody would ever look at me, in my dorky mom clothes, and think I love sci-fi and 80s horror films. 

So, this one's for you, really nice corporate Christian book supply guy in a button down shirt with a name tag on! I applaud your taste in 80s horror films. 

The Evil Dead (1981)

If you are unfamiliar with The Evil Dead trilogy, allow me to introduce you to it. It is the creation of Sam Raimi, whom you may know from the likes of Xena, Warrior Princess; SpiderMan; and Drag Me to Hell. The brilliant thing about The Evil Dead trilogy is that it starts off in all seriousness, with the first film being gory, gross and really spooky. Then the second film, The Evil Dead 2, starts to get a bit comical toward the middle - ridiculous amounts of blood, Ash's hand turning against him (this is where he gets his famous chainsaw arm), among other silly things. The third film in the trilogy, Army of Darkness, just goes balls out with zaniness. Ash is a total bad ass and he says tons of hilarious stuff. You can find literally thousands of Ash and Army of Darkness t-shirts, posters, toys, action figures, comics and so much more. It's a cult sensation. And it's totally delightful, just like these Evil Dead Delights.

Army of Darkness has a fabulous tagline:
"Trapped in time. Surrounded by evil. Low on gas."

I have a confession to make. I am one of those degenerate regulars you see in the clearance section of Half Price Books. You know, that shadowed section full of weirdos way back in the butt end of the store, right next to the bathrooms. Yeah, that's the one! Well, you may not know it but there's a cookbook section back there. And it rocks! My most recent score was a clean hardback copy of Skinny Bitch Bakery. Guess how much I paid for it. Go ahead, guess! Two bucks, my friend. It even has the dust jacket on it. Yeah, it's missing a few pages in the middle, but that ain't no thang. I can cook around that.

How can your mouth not water just looking at these things?!
And, yeah, they taste every bit as good as they look.

So, here's the recipe I chose to represent my Evil Dead Delights - Kim Barnouin's "Sanctuary Tracks Cookie Bars" from the Skinny Bitch Bakery cookbook. My personal baking notes are written parenthetically to the side of each ingredient. Deeeeee-licious!

1 tablespoon soy milk or creamer
1 cup mashed banana (I used one banana)
2 1/4 cups all-purpose flour (I used whole wheat)
1/2 teaspoon baking soda
1/2 teaspoon sea salt (I used regular ol' salt)
3/4 cup non-dairy margarine (I used Earth Balance)
3/4 cup evaporated cane sugar (I used organic white sugar)
3/4 cup packed brown sugar
1 cup crunchy organic peanut butter (I used creamy)
2 teaspoons vanilla extract 
1 1/2 cups vegan chocolate chips
1 cup organic raspberry jam (I used apricot preserves)

  • Preheat the oven to 350 degrees. Lightly grease a 13x9" pan and set aside. In a small bowl, combine the soy milk and mashed banana and mix well. In a large bowl, sift together the flour, baking soda, and salt. In a separate bowl, cream the margarine, sugars, and peanut butter; then add the vanilla extract and banana mixture.
  • Slowly add the dry ingredients to the liquid mixture until combined. Stir in the chocolate chips until well combined. Evenly spread half of the dough in the pan. Spread the raspberry jam on top of the dough, and add the remaining dough mixture; smooth with a rubber spatula.
  • Bake the cookie bars for 20 to 25 minutes, or until they are golden on top. Let the cookie bars cool completely before cutting them into squares.

August 31, 2014

C.H.U.D. C.H.I.L.I.


Why, yes, that is an edible C.H.U.D., complete with carrot claws and olive eyes. Is it too terrifying to eat, or too cute? I'll let you decide.
Happy MoFo, everyone! Let's get this month-long party started! 
The theme I'm working with is 80's horror films. And what better film to start with than C.H.U.D.?

I grew up in Waco, TX, and the only place to rent movies was at a place called Flicks, which was in a tiny converted house wedged between the Piggly Wiggly and a full-service gas station. I was a frequent Flicks customer. My PawPaw drove me there every Friday and Saturday and I would easily watch between 4 to 6 horror films every weekend. There really wasn't much to do in Waco, TX, in the 80s before you were old enough to drive. My grandparents weren't too savvy about the movie titles, and they never ventured into Flicks themselves, so they didn't have a clue what I was watching. Seriously, I saw The Exorcist (alone!) at ten years old. And The Texas Chainsaw Massacre. And The Amityville Horror. And on and on and on... Am I scarred for life? Maybe, but the point is this: My middle-aged brain is now full of mildly useless trivia and quotes from all the horror movies I watched as a kid. And now I'm going to parlay that knowledge into fun recipes for the purpose of Vegan MoFo 2014. Woo Haw!

C.H.U.D. (1984)
C.H.U.D. - if you didn't already know - stands for Cannibalistic Humanoid Underground Dwellers. The movie is terrible, but a lot of fun to watch. This one is particularly special to me because it is the only horror film I ever watched with my grandparents in the room. I was horrified the entire time it played, but MeeMaw and PawPaw chuckled in the background and chatted with each other, probably just bored and wishing they were playing dominoes or something.

I really want to get my hands on the C.H.U.D. DVD because, apparently, there is a fantastic commentary track that is "better that MST3K" (according to a reviewer on the movie's IMDB page). Being a huge fan of MST3K, I need to find out if this is true. I suspect it might be, as Daniel Stern is one of the commentators and that guy is hilarious.

So, anyway, on to my first MoFo creation, C.H.U.D. C.H.I.L.I!

I topped my C.H.U.D. C.H.I.L.I. with sliced and browned
Tofurky Italian Sausages and fresh pico de gallo.
1 cup vegetable broth, or more as needed
Half a white or yellow onion, diced
4 cloves garlic, crushed and minced
1 red bell pepper, diced (can sub green if you're broke)
2 large carrots, peeled and chopped
1 large zucchini, peeled and chopped (don't peel if it's organic)
1 jalapeno, seeded and minced
1 28-ounce can pinto beans, drained and rinsed
1 15-ounce can black beans, drained and rinsed
1 28-ounce can diced tomatoes
1 6-ounce can tomato paste 
1/2 teaspoon chili powder
1 teaspoon cumin
1 teaspoon dried oregano
Pinch of cayenne pepper
Salt and pepper, to taste
1 bunch fresh cilantro, coarsely chopped

  • In a large pot, get your vegetable broth cooking over medium-high heat. Once it's pretty toasty, toss in your onion, garlic and carrots. Saute them in the broth until they begin to soften. This only takes a few minutes. Don't let your veggies turn to mush.
  • Add the zucchini, bell pepper, jalapeno and spices. Cook for a couple of minutes. Add more broth if needed, just to keep things from sticking.
  • Throw in your beans, diced tomatoes and tomato paste. Cover and cook for about half an hour on medium-low heat, stirring occasionally. Dribble in some extra broth to get it to the texture you like. Some folks like thick chili, some like it runny. 
  • When it's about ten minutes from being ready, toss in your cilantro. I like to give the cilantro just enough time to flavor the chili, but not overcook it so that it stays bright green and beautiful.
  • Keep tasting and tweaking every now and then. You might want more spices or more beans. This chili is very forgiving. Just get it to the point that it tastes fantastic to YOU.
  • I like to top my chili with sliced and browned sausages (Tofurkey's Italian Sausages are only $2.99 at Trader Joe's right now!) and fresh pico de gallo. You can also try some vegan sour cream or vegan cheese! Vegan queso is delicious on this too.
  • Enjoy, and don't get too close to any steamy manholes.

August 16, 2014

So, Basically I'm a Genius

I discovered something wonderful. 

If you put this...


and this...


together like this...


it totally tastes like this!


You're welcome.

August 14, 2014

Apricot Coconut Oatmeal Clusters


You know how some people do some stuff to relief stress in their lives? Like, my husband loves to read boring philosophy books and write songs on his guitar. That's just how the guy unwinds. My neighbor is a gardener and a fairly hardcore churchgoer - that's what blows his hair back. You know what I mean? We all have that thing that we love to do, and it makes us feel really good, and without it we get really, really wound up. For me, it's baking. I mean, seriously, I freakin' love to bake! But I'm... well... what's the PC term for it... I'm - uh - differently weighted... I'm gravitationally challenged... You get me? I'm fat, people! I'm a fat herbivore. Yes, they do exist! And I don't have a problem with being fat. My husband thinks I'm sexy, so it really doesn't bother me too much, with the exception of the fact that I am forever destroying the poor underwires in my bras and my knees are begging for mercy 24/7. There's also the desire to live long enough to meet my grandchildren and to enjoy the twilight years of retirement, kickin' back on the shore outside my imaginary lake house. So! To that end, I am always trying to create baked goods that are at least moderately healthy, but definitely succulent. But not SO succulent that I eat forty at a sitting. To that end, I introduce my latest home-bakery creation, the Apricot Coconut Oatmeal Cluster. It was meant to be a cookie, but it came out more like a clustery thing, so there ya go. There's no oil or butter in it, and minimal sugar (compared to my standard baked fare), plus it's jam-packed with fiber, so it's a win-win! Give these li'l cuties a try. You'll love 'em and you don't even have to feel guilty about eating them.


1 ripe banana, mashed with a fork
1/4 cup unsweetened applesauce
1/2 cup sugar
1/4 cup liquid sweetener (I used agave, but maple syrup'd work)
2 tablespoons almond milk
1 teaspoon vanilla extract
1 1/2 cup rolled oats
1/2 cup whole wheat flour
1/4 teaspoon baking soda
1/4 teaspoon ground cinnamon
Dash of nutmeg
1/2 to 1 cup dried apricots, coarsely chopped
1/4 to 1/2 cup unsweetened coconut flakes*
  • Preheat oven to 350 degrees F.
  • Spray a large cookie sheet with baking spray, or use parchment paper or a SilPat.
  • Mix the banana, applesauce, sugar, liquid sweetener, milk and vanilla together in a large bowl. 
  • On top of the wet mixture, gently add the dry ingredients, but do not stir until you have everything added.
  • Stir gently until just mixed.
  • Gently fold in the apricots and coconut flakes. 
  • *Side Note: I used organic unsweetened coconut flakes, which is what you see in the picture, not standard shredded coconut. But I think you could just about use anything in these clusters and it would taste nice. For example, you could eliminate the cinnamon and nutmeg and throw in some dark chocolate chips in place of the coconut. Or some nuts! Feel free to play around with the recipe and share your results in the comments.
  • Drop by rounded teaspoon onto cookie sheet (I used a small cookie scoop).
  • Bake for 15 minutes.
  • Enjoy with an ice cold glass of almond milk or a cup of hot Earl Grey tea. Delicious!

November 15, 2013

Double Chocolate Chip Cookies


Welcome Vegan Potluckers!

As part of the Virtual Vegan Potluck blog tour this year, I am happy to be a part of the "Dessert Course." Last year, I was a "bread course" gal (click HERE to see last year's entry), but this year I'm goin' whole hog sugar rush with some decadent double chocolate chip cookies. DIABETICS BEWARE!


1/2 cup soy or almond milk
1 tablespoon ground flax
1 cup sugar
1/2 cup canola oil
1 tablespoon vanilla or almond extract 
1 1/2 cups pastry flour or all-purpose flour
3/4 cup unsweetened cocoa powder
1 teaspoon baking soda
1/2 teaspoon salt
1 cup semisweet chocolate chips
  • In a small bowl, mix the ground flax with milk and set aside for about 10 minutes, then stir again.
  • Cream together the sugar and oil, until smooth and silky. Add vanilla and mix.
  • Add dry ingredients (but not the chocolate chips) to wet, but do not stir until all dry ingredients are in the bowl. Mix well, but do not overmix. Just mix gently until everything is moist and well-incorporated.
  • Fold in the chocolate chips.
  • Place by rounded tablespoonful, two inches apart, on an ungreased cookie sheet and bake for 8 to 10 minutes, until crispy on the top and around the edges, but still moist in the middle. Allow to cool on a wire cooling rack before eating or storing.
  • These are fabulous with an ice cold cup of almond milk!
VEG COACH
VEGAN HERITAGE PRESS

October 20, 2013

Mexican Shepherd's Pie


I was recently lamenting in the Herbie Parents Facebook Group that my daughter is getting sick of all my usual dishes. She told me last week that she never wants to eat tofu scramble "EVER again.!" In her defense I do make it a lot, like a lot-lot. I can't help it! Isa Chandra's recipe over a stovetop-heated corn tortilla with a bunch of fresh guacamole on top is the greatest breakfast known to mankind.
Anyhoo, the point is that I requested new recipe ideas in Herbie Parents and I got a lot of great suggestions in return, including a recipe called "Katie's Mexican Tamale Pies," from the Chocolate-Covered Katie blog.
I am far too lazy to make teeny pies out of anything that isn't sugary sweet and/or doused with chocolate, but I definitely liked the looks of this recipe. So, I took the basic idea of the recipe, tinkered with it and added a a few new things, then casseroled the whole thing and topped the finished product with guacamole.
The verdict from my five-year-old? Total success! She loved it. I hope you will too. Special thanks goes out to my peeps in Herbie Parents for this one!!

1 15-ounce can pinto beans, rinsed and drained
1 15-ounce can diced tomatoes
1 small package frozen corn (about 2 cups)
1 12-ounce package LightLife Smart Ground
2 tablespoons Homemade Taco Seasoning (or more, to taste)
1/4 cup vegetable broth, or water
1 cup cornmeal
1/2 teaspoon salt
1/2 teaspoon garlic powder
2 2/3 cups water


  • Preheat oven to 350 degrees.
  • Place the beans, tomatoes, corn, SmartGround, taco seasoning and broth into a large pot and cook over medium heat, stirring occasionally, until corn is thawed and all ingredients are well-seasoned. Taste, taste, taste to make sure it's perfect. 
  • While your filling is warming up, go ahead and prep your polenta topping. 
  • Mix the cornmeal, salt, garlic powder and water in a medium saucepan and cook over medium-high heat, stirring frequently, until boiling. Then, reduce the heat the low and allow the mixture to simmer until thickened, still stirring frequently.
  • Spray a medium-sized casserole dish with a light coating of oil. Place your bean filling into it, then top with the polenta, spreading it evenly over the top.
  • Bake for 45 minutes.
  • Remove from oven and allow to sit for five or ten minutes, until bubbling stops around the edges.
  • I highly recommend that you whip up some homemade guacamole while your casserole is cooling. It tastes A-M-A-Z-I-N-G on the top!
  • The next time I make this, I will probably throw in some onions and fresh cilantro, or maybe some fresh homemade pico de gallo. I think any or all would be fantastic additions! I just didn't have any on hand tonight.
  • Enjoy!

P.S. I know Mexican Shepherd's Pie is a dorky name, but I couldn't think of anything else to call this dish. It looks remarkably like a shepherd's pie when you cut into it! Check this out...

June 4, 2013

Low-Guilt Chocolate Chip Cookies


Please take heed that I titled these cookies "low guilt," not "NO guilt." So, yes, there is a small amount of guilt involved with the consuming of these cookies, but I just love eating cookies so much, I will accept an extra dimple or two on my butt as a token of my affection for this confection.

I do still love whipping up Dreena Burton's yummy Homestyle Chocolate Chip Cookies when I can, but my pocketbook does not often allow the purchase of maple syrup. Seriously, why is that stuff so expensive?!
So, I took the liberty of altering Isa Chandra's Chocolate Chip Cookie Recipe from the Post Punk Kitchen and tried to make it just a smidge healthier, albeit not totally guilt-free.

I replaced half of the oil with unsweetened applesauce, left out the milk entirely, subbed potato starch for tapioca starch (because it's cheaper), subbed whole wheat pastry flour for the dastardly white stuff, and added in an extra quarter cup of chocolate chips (because I flippin' love chocolate).
The verdict? Slightly less evil, but just evil enough to taste amazing. The family went nutso for these, and my husband was shocked that I'd removed an entire 1/3 cup of oil. He said he couldn't tell the difference at all between these and the wonderful Isa Chandra recipe I've been making for years.
Give these a try and let me know what you think!

1/2 cup brown sugar
1/4 cup granulated sugar
1/3 cup unsweetened applesauce
1/3 cup canola oil
2 tablespoons potato starch (this sounds weird, but I promise it's cheap and easy to find)
2 teaspoons vanilla extract
1 1/2 cups whole wheat pastry flour (can sub white flour)
1/2 teaspoon baking soda
1/2 teaspoon salt
1 cup semisweet chocolate chips
  • Preheat oven to 350 degrees, and lightly oil two large cookie sheets. In lieu of oil or baking spray, a Silpat works well for these cookies if you have one.
  • Mix together the sugars, applesauce, oil, starch, and vanilla until smooth and creamy. 
  • Add flour, soda, and salt. Stir until well-incorporated and smooth, but take care not to overmix or your cookies will lose that crunchy-on-the-outside-soft-on-the-inside magic that makes them so good.
  • Fold in the chocolate chips.
  • Use a Small Cookie Scoop to scoop out your dough. Place 16 dough balls on each cookie sheet, and bake for 9 minutes. Watch the cookies closely during that last minute, to make sure they aren't getting too overdone.
  • They will be puffy when you pull them out of the oven, but as they cool, they will flatten and crisp to perfection.
  • Enjoy!
CLICK/SHOP/SUPPORT