Showing posts with label brunch. Show all posts

April 3, 2017

Quick and Easy Tropical Sorbet


The story behind this homemade sorbet is fresh in my memory because:
a) it's short, and
b) it literally just happened twenty minutes ago.

My daughter was coming into the house, after playing outside for a while, and she banged her top lip on the metal door, giving it a little scrape and making it swell up. So, I told her I'd make her something cold to help the swelling go down. I thought I would whip up a smoothie real quick, but my blender was in the dishwasher getting hosed down. However, my food processor was clean and available! So, I swirled together a bunch of stuff that I found in my freezer and fridge and made a sorbet, not certain how it was going to turn out. But you know what? IT WAS DELICIOUS! I thought I'd hop onto the blog and share it with you guys before I forgot what I put in it - it's perfect for a cooling spring and summer pick-me-up. I put the leftover sorbet in popsicle molds. Can't wait to try those too!

This makes a lot, so halve the amounts if you don't want more sorbet than two to four people can eat in one sitting. Also, I'm just kind of memory-eyeballing the amounts here. I did not measure this. I just tossed stuff into the food processor and hoped for the best. It's just how I like to live my life.

1 cup frozen pineapple chunks
1 cup frozen peach slices
1 cup frozen nectarine slices
1 cup frozen strawberries
1 cup frozen mango chunks
1 cup ruby red grapefruit juice
3 tablespoons agave or maple syrup, or more to taste
1/2 - 1 cup non-dairy milk, to taste

  • Put everything except the milk into a large (I think mine is a 4-quart) food processor and start spinning on high. Gradually drizzle in the milk, just a few tablespoons at a time, to thin out the mixture to your desired consistency. 
  • Serve it up and enjoy!

October 3, 2016

Banana Walnut (or Choc Chip) Muffins


I'm sorry I haven't posted in a while, but I've started homeschooling my kiddo  and that is keeping me very busy! Gone are the days of solitude where I can clean house for a while and then cook and blog while the washer is running. But, that's okay, I love homeschooling and so does my daughter! But I'll still post when I can. In the meantime, I picked up a new-to-me cookbook called The 30-Day Vegan Challenge by Colleen Patrick-Goudreau (whose podcast, Joyful Vegan, is fantastic!) and I'm so excited about it that I wanted to share the first recipe I made from the book.

My daughter is 8-years-old and is obstinate about vegan food. Sorry, "vegangelicals," but she is very adamant that she does not want to eat vegan food and while I frequently encourage her to try it, I do not force her to eat only vegan. But, I am a sneaky redhead, so here's what I've been doing - I've been making vegan recipes and not telling her they're vegan and keeping tabs on the ones she really likes. So far, I've only been able to trick her with my three-bean chili. I use the Trader Joe's vegan ground beef substitute and she honestly hasn't noticed that it's not beef. Now, the reason I'm so excited about Ms. Patrick-Goudreau's cookbook is because it has lots of yummy-looking "kid food" in it, like mac and cheese, chocolate cake, and quesadillas, and when I showed my daughter the photos in the book she said, "Mmmm, that looks good! Get this cookbook." I never told her it was a vegan cookbook. I'll keep you posted on how she responds to the recipes.


This is the recipe for Banana Chocolate Chip Muffins, but I didn't have any chocolate chips, so I subbed chopped walnuts instead.

2 cups whole wheat pastry flour or unbleached all-purpose flour
1 1/2 teaspoons baking soda
1/2 teaspoon salt
1 cup granulated sugar
1/3 cup canola oil
4 ripe bananas, mashed
1/4 cup water
1 teaspoon vanilla extract
1 cup semisweet chocolate chips (or chopped walnuts)
  • Preheat oven to 350 degrees.
  • In a medium-sized bowl, mix together flour, baking soda, and salt. Set aside.
  • In a large bowl or stand-mixer, beat oil and sugar together. 
  • Add mashed bananas and mix.
  • Add water and vanilla. Mix again.
  • Use a spoon to gently stir the flour mixture into the wet mixture.
  • Fold in chocolate chips or walnuts.
  • Fill each muffin tin halfway with batter. (With the use of the Reusable Silicone Baking Cup Liners, I was able to get 20 muffins out of this batch.)
  • Bake for 20 - 30 minutes, until a toothpick inserted in a center muffin comes out clean.
  • Enjoy!

January 27, 2016

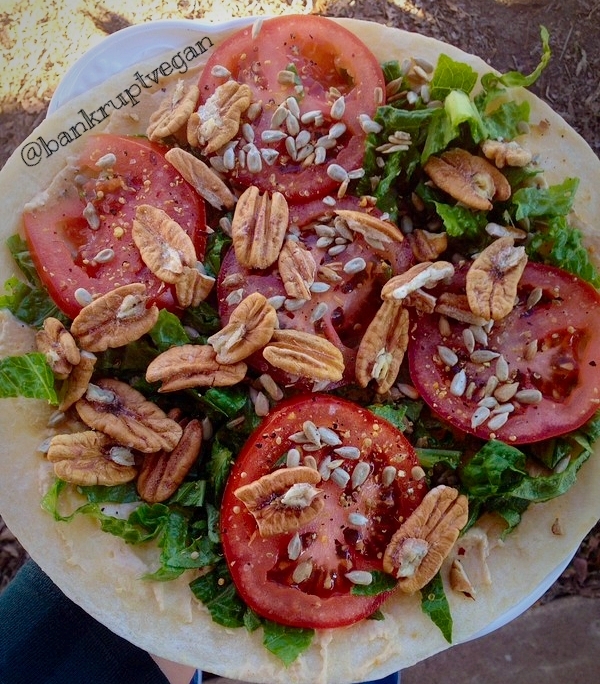
Triple Protein Power Wrap


Feeling peckish, friend? Try this triple protein wrap and you will perk right up! It couldn't be easier. Just get the following stuff together and wrap it up into a little burrito of awesomeness.

Large tortilla, warmed on the stovetop
Your favorite hummus
Several medium tomato slices
A handful of lettuce
A handful of sunflower seeds
A handful of your favorite nuts (I used pecans)
Your favorite salt, pepper, herbs and spices*


*I used the Everyday Seasoning from Trader Joe's. It's so yummy! (And cheap.) If you don't have a Trader Joe's in your neighborhood, you can put together something similar on your own. The Everyday Seasoning contains sea salt, mustard seeds, black peppercorns, coriander, onion, garlic, paprika and chili pepper.

Sweep the hummus on your tortilla, then top the whole thing like a pizza. It should look something like this. 


Then carefully, and as tightly as you can, roll it up into a lovely wrap. Cut in half and enjoy! Taste great with a kombucha or an iced tea!

January 16, 2016

Vegan Nacho Cheese Sauce


Oh my Lord, people. My life just got seriously better because I tasted this cheese sauce. It is AMAZING! And, guess what, it's two main ingredients are carrots and potatoes. Seriously!

How do carrots and potatoes come together to chemically formulate what is easily the best-tasting vegan cheese sauce I've ever stuffed into my face? Is it magic? Some kind of medieval sorcery? I don't know, but I am so grateful!

2 cups peeled, cubed, boiled, drained potatoes (about 2-2 1/2 medium potatoes)
1 cup peeled, chopped, boiled, drained carrots (about 3 medium carrots)
1/2 cup nutritional yeast flakes
1/3 cup canola or extra virgin olive oil*
1/3 cup water or vegetable broth
1 tablespoon lemon juice
1 teaspoon salt, or more to taste
1/2 teaspoon turmeric, or more to taste
1/2 teaspoon chili powder, or more to taste
Unsweetened non-dairy milk of choice, to taste
  • Place all ingredients into a high-powered blender** and blend. It's just that simple! Put your drained carrots and potatoes into the blender right after you drain them, while they're still piping hot, so your cheese will be piping hot too.
  • As you're blending, drizzle in some milk to help thin it out a bit, if you want to. 
  • Can be stored in the fridge, in an airtight container (I'm not sure how long because we always eat it up pretty quickly), for a few days, perhaps? 
  • *I'm working on figuring out a way to reduce the oil in this recipe. It's way too much, I know. I'll keep fiddling with it and get back to you.
  • **If you don't have a high-powered blender (I sure don't), you might want to liquify in a food processor first, then transfer to a blender and drizzle in the milk while blending, to keep your little $20 blender from overheating.
  • Enjoy!

November 3, 2015

Banana-Pecan Muffins


I hope everyone had a fabulous Halloween! We tried the "Switch Witch" thing for the first time this year. My daughter was able to go out and trick-or-treat like everyone else, but at the end of the night she left her candy out for Switch Witch, who swooped in while she was sleeping, took her garbage candy ("to feed to her naughty cat") and left, in it's place, good quality candy that I don't have to worry about her eating. No dyes, no preservatives, etc. It worked like a charm and my kiddo didn't have to feel left out of the Halloween festivities! The junk candy went to work with my husband who left it out in the breakroom for his co-workers. 

The morning after Halloween I made these fantastic muffins because I wanted to use the tons of pecans falling from the tree in my front yard right now! I seriously have three buckets full of pecans and at least three or four dozen more pecans fall from the tree every day. I love pecans, so I'm in heaven! I can't wait to make pies. If you don't have pecans, or they are too expensive, any nut will do. Or you can replace the nuts in the streusel topping with oatmeal, which is super cheap. Feel free to be creative!

Also, my daughter (who is a really picky eater) absolutely LOVED these! She ate two for breakfast, then came home after school and ate four more. If you have kids, you might want to make a double batch.

1 1/2 cups non-dairy milk (I used unsweetened almond)
2 teaspoons apple cider vinegar
2 2/3 cups flour (I used white whole-wheat)
1 1/2 teaspoons baking powder
1/2 teaspoon baking soda
3/4 teaspoon salt
2 teaspoons cinnamon
1/3 cup vegan butter, softened
3/4 cup granulated sugar (organic preferred)
1/4 cup vegan yogurt (I used unsweetened coconut yogurt)
1 teaspoon vanilla extract
2 large overripe bananas, mashed
1 cup pecan pieces
1/2 cup brown sugar (organic preferred)
  • Preheat oven to 325 degrees. Grease a 12-muffin tin or place paper liners in it.
  • In a small bowl, whisk the milk and vinegar together and set aside to allow it to curdle.
  • Beat butter and sugar together until light and fluffy, about two minutes or so. 
  • Add yogurt, milk and vinegar mixture, and vanilla. Mix well. 
  • Add bananas and mix again.
  • On top of your soft mix, dump the dry ingredients. Flour, baking powder, baking soda, salt and cinnamon. Then stir with a spoon or beat gently until well-incorporated, but take care not to overmix or your muffins will be tough.
  • Spoon the batter into your muffin tin, filling each cup almost to the top. I did two scoops into each cup with a large cookie scoop, and that worked perfectly. 
  • In a separate bowl, mix your nuts or oats with the brown sugar and spoon it onto the tops of your muffins. 
  • Bake for 15 to 20 minutes, or until a toothpick inserted into the center of a muffin comes out clean.
  • Enjoy!

June 2, 2013

I Can Finally Eat Basil. Life is Good.

Look at those lovely, waxy leaves. They smell and taste as good as they look!
I have been waiting patiently for weeks and weeks to eat the fresh basil I planted in my garden. The crazy-deliciousness of fresh basil is just beyond compare. I've been regularly sniffing the leaves (I admit, I am a chronic leaf sniffer), my mouth watering, just hankerin' for the time I could snip off a few and put them on something - anything - edible, to throw it's flavor profile right out of the ballpark. Normally, my thoughts might hint toward spaghetti or whatever is saucy and of the Italian variety. But it's already blistering hot here in North Texas, so I'm trying to use the oven as little as possible.


Instead, I found some gorgeous tomatoes at Aldi, for super cheap. Big flavorful fatties in a four-pack, for a buck and some change. So, I sliced them up, spritzed them with a generous helping of balsamic vinegar, put a fresh basil leaf on each one, then topped them with a slice of cucumber and some black pepper. They were AMAZING! Light and full of the fresh flavors of summer. I am planning to serve these at every dinner party I throw from now until the end of time. Give it a try!

P.S. If you're not already growing your own basil, it's not too late!
Here's a great website with all the info you need to get growing.
http://www.growing-basil.org/

CLICK/SHOP/SUPPORT

May 19, 2013

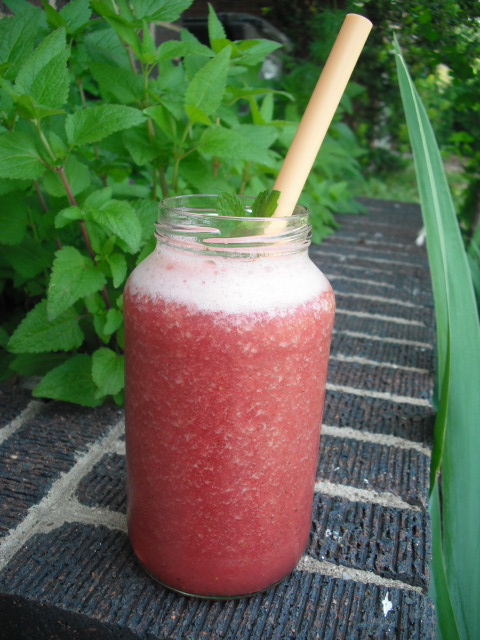
Watermelon-Berry Summer Sipper


It's not even June yet, and we're already climbing up into the 90s here in the Lone Star State. We've gotten out the blow-up pool, strung up the hammock, and started hoarding ice cubes in preparation for another long, hot Texas summer.

Here in Texas, we like to say...

"It's hotter than a billy goat in a pepper patch!"
"It's so hot the hens are layin' hard-boiled eggs!"
"It's so hot I used my seatbelt buckle as a brandin' iron!"
"It's hotter than a preacher's knee!"
"It's hotter than whoopie in woolens!"
"It's hotter than a burnin' stump!"

This explains why I'm inside my nice, cool house sippin' on my Watermelon-Strawberry Summer Sipper while the husband and kid splash in the pool. Don't judge me - I took some Sippers out to them too. But I'm stayin' right where I'm at, watching the flowers grow through my window panes, while the ceiling fan laps my bangs. Ahhhhhhhhh, summer in Texas...

Flesh of half a baby, seedless watermelon (volleyball-sized)
Half a peeled cucumber
8 to 10 large strawberries
8 to 12 large fresh mint leaves (you should grow this - it's so easy!)
Between 0 (if you're good) and 3 (if you have a kid) Tbsp sugar
About 8 to 10 ice cubes

  • Put all of the fresh stuff into your blender, then just top it off with as many ice cubes as you can fit.  
  • Whirl away!
  • Enjoy.

YUMMMMMMMMM...

CLICK/SHOP/SUPPORT

May 17, 2013

Tempeh Bacon "BLT" Sandwich


I was recently skulking around on the Happy Herbivore's Facebook Group, "Herbie Parents" (great group of really sweet, supportive folks!) and I read a post wherein a pregnant vegan gal admitted to the group that she is having desperate cravings for deli meat, and might there be a yummy vegan replacement? Follow-up comments suggested all sorts of brands and types of faux meats that might fit the bill, but I don't like how overly-processed all that stuff is, so I suggested the Tempeh Bacon "BLT" I found recently on the Prevention RD website. It is sweet and smoky, and tempeh is fairly easy to come by at any veg-friendly grocery store. Plus, the recipe is a cinch! Just mix the marinade, pan fry the "bacon," and build the sammie.

It's the perfect meal for a Friday night at home with the family. I say that because this is what we had for dinner tonight - that very sandwich you see in the photo was snarfed greedily by yours truly only mere seconds after snapping this picture. I paired it with a side of cut fresh fruit and cucumbers mixed with fresh chopped mint leaves (straight from my garden) and fresh-squeezed lime juice. It was so good! My husband said of the sandwich, "I could eat about three more of these." High compliment from the man of the house! And my daughter said, pulling the tempeh ever so slightly out of the sandwich and eyeballing it with curiosity, "What is this stuff? It tastes good." She's four, so... you know that's pretty high praise.

Here's the original recipe from Prevention RD:

"Tempeh 'Bacon':
5 oz tempeh
2 Tbsp maple syrup*
1 Tbsp olive oil
1 tsp liquid smoke
1 tsp low-sodium soy sauce
1/2 tsp cumin
1/2 tsp black pepper
a dash of cayenne
To assemble:
6 slices of whole grain bread
1 tomato, sliced
6 large lettuce leaves
3 Tbsp light mayonnaise
  • Slice tempeh into about 6 oblong strips.
  • Combine maple syrup, olive oil, liquid smoke, soy sauce, cumin, pepper, and cayenne in a shallow dish. Soak tempeh in marinade for 2-3 minutes, turning to coat.
  • Turn a saute pan on medium-high and spray with non-stick cooking spray. Add the tempeh to the pan in a single layer and cook 1-2 minutes on each side, or until browned.
  • Build three sandwiches with 1 tablespoon mayonnaise, 2 lettuce leaves, tomato slices, and about 2 slices of tempeh. Serve immediately. Yield: 3 servings.
  • Nutrition Information (per serving): 408 calories; 16 g. fat; 5 mg. cholesterol; 583 mg. sodium; 55 g. carbohydrate; 12 g. fiber; 16.7 g. protein
  • Result: Sweet and salty tempeh make this BLT a much more nutritious option. Healthy fats and lots of fiber make for a filling, heart-healthy sandwich. The tempeh bacon takes about 10 minutes to prepare and cook, so this meal comes together in a jiff! Enjoy!"

*I don't know about you guys, but I straight-up cannot afford maple syrup. For this recipe, I subbed some organic raw agave nectar that I got on a deep sale at Sprouts. OR, you can use use this recipe for Homemade Maple Syrup if you're really broke.  --Jen

CLICK/SHOP/SUPPORT

May 10, 2013

Homemade Flour Tortillas


Welcome Vegan Potluckers!

As part of the Virtual Vegan Potluck blog tour this year, I am happy to be a part of the "Bread Course." At first I was going to make the huge loaves of bread that I put into my Thanksgiving meal a couple of years ago, but then I would be forced to butter and consume said loaves, which might not do flattering things to my arse. So, since avocados were on sale at three for a dollar last week, and I have a ton of them to eat, I thought to myself, "Tortillas! Yes, tortillas!" They are perfect for dipping into AwesomeSauce (we have seriously made a meal of this), or slathering with guacamole (again, a full meal of just this), or my favorite thing of all - a wrap consisting of guacamole, alfalfa sprouts, and halved cherry tomatoes. It doesn't sound like much, but it's seriously amazing. And, between you and me, you will BM like a soldier for the rest of the day after you eat it. Woo hoo!


HOMEMADE FLOUR TORTILLAS
4 cups whole wheat pastry flour (can sub all-purpose flour)
1 tablespoon baking powder
1 teaspoon salt
1/2 cup oil
1 1/2 cups cold water


Place all dry ingredients into a large bowl and whisk until mixed. Add oil and stir. Add water in 1/2 cup increments, stirring or mixing with hands after each addition. Knead gently in the bowl, for just a minute or so, until dough resembles photo above. Allow dough to rest at room temperature for 10 minutes.
Pinch off a piece of dough no larger than the cup of your palm,
and roll it into a ball.
Lightly flour your rolling surface, as well as your rolling pin.
Roll out your dough ball, getting it as thin as possible.
Place rolled dough onto a hot ungreased cast iron griddle. 
Allow to lightly brown on both sides. 
I like to roll out my next dough ball while the first is cooking. 

Repeat until all your balls are rolled flat and cooked up right.

Enjoy!
www.passtheveggies.com
www.themisfitbaker.com

April 17, 2013

"AwesomeSauce" Even Omnis Will Love


My favorite vegan restaurant, Spiral Diner Fort Worth, makes an amazing nacho dish with what seems to be the latest sensation, a vegan "cheesy" sauce made from cashews. I love these nachos super hard. They are mouthwatering and fantastic. I even eat the jalapeno slices on top, because there's the microscopic possibility that they might be ever-so-slightly impregnated with the sauce. The only problem is that, despite their fantastic food and friendly waitstaff, Spiral Diner has one slight imperfection... It's expensive! And I'm eternally broke! To be fair, they do charge a decent price considering that the bulk of their foodstuff is organic. And, if I could afford it, I would not feel ripped off eating there every single day. Hell, every single MEAL if I could! But, sadly, my trips to Spiral happen only a handful of times per year. And I am forever trying to copy their recipes so that I can make their delicious yums at home for a fraction of the price. They do teach cooking classes on occasion, but I can't afford those either. What's a poor vegan to do??

Today I was really, desperately craving those nachos. Like, I mean, I had to have 'em, man! And I know the  not-so-secret ingredient in Spiral's "cheesy" sauce is cashews. But, since when can a poor person afford raw cashews? Since almost-never, that's when. So, I farted around with a couple of cashew-free "cheesy" sauce recipes I found online and came up with my own delicious chip-dipping substance, sans the expensive cashews. And it is fabulous!

Even your omni friends will love it. They won't have any idea it's vegan - it's way too decadent to be rabbit food! They'll think it's some exotic, richly creamy awesomesauce. Hence the name, "awesomesauce." I hope you enjoy it as much as I did!

1/2 cup nutritional yeast
1/4 cup whole wheat pastry flour (can sub all-purpose flour)
2 tablespoons cornstarch
1 teaspoon salt
1/2 teaspoon garlic powder
1/4 teaspoon turmeric (optional)
2 cups water
1 teaspoon mustard
  • Whisk all ingredients together in a medium saucepan.
  • Bring to a slight bubble, stirring constantly, over medium heat. 
  • As soon as mixture begins to bubble, reduce heat to low and continue whisking until sauce thickens. Sauce will continue to thicken as it cools, so be careful not to overcook.
  • Turn heat off and remove saucepan from heat source. Stir a few more times and serve. 
  • Enjoy!
P.S. AwesomeSauce can be stored in an airtight container in the fridge for a few days. To reheat, just add a tablespoon or two of water and stir gently over medium-low heat until warm.

CLICK/SHOP/SUPPORT

October 15, 2012

Divine Whole Wheat Banana Bread


I know there are about eight billion banana bread recipes floating around the interwebs, but I have an entire tropical forest of overripe bananas sitting in my freezer and I need to use them!
I swear, I've never made the same banana bread recipe twice. I am always changing up my recipe, trying new ones, different flavors, exotic add-ins. Today I just wanted something simple. I went with what I had in my pantry, which explains the use of brown sugar and coffee liqueur (which I've discovered is a great substitute for vanilla). It turned out very moist and not-too-sweet, and we all really enjoyed it. This might be the one banana bread recipe I actually make more than once. I hope you like it too! 

2 tablespoons golden flax meal
1/4 cup warm water
4 medium to large overripe bananas, mashed
1/3 cup canola oil
1 cup whole wheat flour
1 1/4 cups white whole wheat flour
1/2 cup brown sugar, packed
1 teaspoon baking powder
1 teaspoon salt
1 teaspoon pure vanilla extract (or 1 tablespoon coffee liqueur)
1 teaspoon cinnamon
1/4 teaspoon nutmeg
  • Preheat oven to 350 degrees, and grease a standard loaf pan.
  • Mix the flax meal and water together, and let stand for several minutes. Stir again before adding to recipe.
  • In a large bowl, mix together bananas and oil. 
  • Add flax mixture, and mix again.
  • On top of your wet mixture, gently dump all of the dry stuff. Do not start mixing until all of the dry ingredients are in the bowl.
  • Gently mix or stir until everything is well-incorporated. Be careful not to overmix. Batter will be slightly lumpy, and that's okay!
  • Pour into loaf pan. Bake for 40-50 minutes, until a toothpick inserted into the center of the loaf comes out clean.
  • Allow to cool for at least half an hour before digging in. Slice, butter, and enjoy!

October 13, 2012

"Cheesy" Corn Grits with Yellow Squash


Sorry I haven't been posting much this week. My husband and daughter both have sinus infections (and so does everyone else in town, it seems) thanks to the massive influx of ragweed blowing in the air. Lo and behold, although I too have been struggling with allergies to the ragweed, I have managed to stave off the sinus infection via use of the magical Neti Pot. If you have seasonal allergies, get one! It totally works. It feels gross when you're pouring salt water into your schnoz, but it's totally worth it. And now I'm the only human in town who doesn't have a sinus infection. I wonder if the Neti Pot also works for zombie outbreaks? Better keep it handy, just in case...

So, today the family seems to be perking up a bit. My husband even cleaned the family room and the kitchen while I took an amazing nap with my two fat kitty cats, Paddy and Putter Jack! It was a magical Saturday afternoon for Jen, y'sir. And when I woke up, feeling totally renewed, I blew into the kitchen to concoct this grits recipe. I had some leftover squash after frying up squash and zucchini in fabulous beer-batter (yes, those are beer-battered zucchini sandwiches you see in the photo) and I didn't want it to go to waste, so here's how I used it:

3 cups water
1 cup white corn grits
1 tablespoon olive oil (or water)
2 cloves garlic, finely minced
1/2 cup yellow squash, finely chopped
1/2 cup vegan cheddar, shredded
2 tablespoons nutritional yeast
Salt and pepper, to taste
  • Bring water to boil in a medium saucepan.
  • Add the grits while gently stirring.
  • Reduce heat to low and let simmer, stirring occasionally, until water is absorbed.
  • While grits are cooking, saute squash and garlic with oil (or water) in a smaller pan or skillet, until soft.
  • When grits are finished cooking, add squash and garlic, along with all remaining ingredients to your grits and stir until the vegan cheese is melted.
  • Salt and pepper on the plate after serving. 
  • Enjoy!

May 25, 2011

Cheezy Spinach and Mushroom Quiche


Yeah, yeah, I know... My quiche has fallen apart. I'm actually still working on perfecting this recipe, but it turned out really tasty last night, so I thought I'd go ahead and share what I've got so far.
The problem here was twofold:
  1. I was impatient and didn't let it cool before I sliced into it.
  2. I didn't properly press my tofu, so that added quite a bit of excess water to my quiche.
But, hey, if you don't mind this dish not looking so traditional, you can throw that tofu right in without pressing it, and start noshing on it as soon as it comes out of the oven. I won't judge. And it still tastes great! 

1 frozen vegan pie shell (I recommend Wholly Wholesome)
1 block extra firm tofu, drained/pressed/crumbled
1 cup vegan cheddar, shredded
6 large white mushrooms, sliced or chopped
1 cup loosely packed spinach leaves, chopped
1/2 red bell pepper, chopped
1/2 yellow onion, chopped
4 cloves garlic, finely minced
Handful of fresh cilantro, finely chopped
1/3 cup nutritional yeast
1 tablespoon paprika
1/8 cup low-sodium soy sauce
1/2 teaspoon turmeric
1/2 teaspoon chili powder
1 tablespoon extra virgin olive oil
Salt and black pepper, to taste
1 cup cherry tomatoes, quartered - for garnish
  • Preheat oven to 400 degrees.
  • Place all ingredients, except garnishes, into a large bowl and stir until well-mixed.
  • Spoon into pie shell and press with back of spoon until top is level.
  • Bake for 50-60 minutes. Watch closely - don't burn your crust!
  • Remove from oven, allow to cool at least 10 minutes.
  • Top with chopped tomatoes.
  • Makes 6 servings.
  • Enjoy!
NUTRITION INFO (per serving, calculated with a whole wheat shell):
Calories: 365.7 / Total Fat: 23.7g (Saturated Fat: 7.1g, Polyunsaturated Fat: 4.3g, Monounsaturated Fat: 5.4g) / Cholesterol: 0mg / Sodium: 718.8mg / Potassium: 468.0mg / Total Carbohydrates: 26.2g (Dietary Fiber: 9.1g, Sugar: 4.3g) / Protein: 18.8g

    December 3, 2009

    Tasty Tofu Scramble


    I have a wonderful alternative to scrambled eggs that does not involve buying one of those expensive "tofu scrambler" kits. Anyway, all those kits do is turn your tofu a weird sunrise yellow color, and they don't taste worth a flip! So, here's the Bankrupt Vegan way to do scrambled tofu.

    Basic Recipe (additions below*):
    2 T oil (your choice, I used sunflower)
    Half a medium white or yellow onion, diced
    2 cloves garlic, minced
    1 block firm or extra firm tofu, drained and squeezed
    3 T soy sauce
    2 T paprika
    1/2 tsp salt
    1/2 tsp black pepper
    1/8 tsp cayenne (or not, this one's up to you)
    1/8 C water
    • Pour oil into a skillet, medium heat. 
    • Add onion and garlic to skillet. Saute until soft and translucent.
    • Cut drained tofu into little blocks (no need to be neat or precise about this) and add to skillet. As you cook tofu, break it up even further with your spatula.
    • Add soy sauce and spices, and stir everything together.
    • Add water.
    • Stir and mix everything up until it looks well-mingled, then cover and let simmer on low heat for about 5 minutes. 
    *Additions:
    • You can add nutritional yeast, if you have some on hand. I always put about a quarter cup of "nooch" in our scramble. It makes it so creamy and delicious, we love it! 
    • Other good additions are roasted or sauteed potatoes (pictured), bell peppers, and grated carrots.
    • Feel free to add any spices that you like. Sometimes I just throw in whatever I happen to have a little extra of, like oregano or thyme. 
    This tofu scramble is so yummy and versatile even your non-vegan friends won't object to a plate, especially when you throw some hot vegan-buttered toast, some hot sauce, and a cup of coffee into the deal.

    It's a great way to start your morning - lots of delicious soy protein and antioxidant rich onions and garlic. My toddler goes nuts for the stuff.

    This recipe easily serves 3-4 people (or 2 really hungry people) and leftovers can be kept in the fridge for a couple of days, then nuked or sautee'd for quick reheating.